Trigger Overview
The Trigger window is used to “connect” your timeline programming to the outside world:

Controllers support a range of interfaces which can be used to Trigger the playback engine including an internal real time & astronomical clock. For example, digital input #1 (connected to a wall panel) could be set to start “Funky” timeline, “Advert” can be set to run on the hour every hour between sunrise and sunset and, at sunset, “Cleaning” would start.
This tab contains two sections. The main section in the middle is the Trigger management area
Creating a Trigger
To create a Trigger, click New Trigger in either the Trigger toolbar or the Configuration Pane. Select the required type from the searchable dropdown menu, see Triggers.
Configuring a Trigger
- Type - the Trigger type
- Number - the Trigger's unique number as used for Web Interface control purposes (can typically be left at the default value unless creating custom pages)
- Name - an identifier for the Trigger used in the Trigger Management Area, Simulate and Web Interface
- Description - a more detailed description for use in Reports.
- Group - the group that the Trigger belongs to (defined by colour) e.g. Red = outside, Green = inside
- Controller - the controller that will process the Trigger, note that Real Time, Astronomical, Ethernet Input and IO Module Triggers are processed by the Network Primary. Note: This is only available if the feature is activated (using advanced feature option
 )
) - Test conditions on - Certain circumstances will require a condition to be tested on a device separate to the device receiving the trigger (e.g. Touch control trigger needing to test timeline status on LPC)
- Absorbed - uncheck to prevent the Trigger absorbing the match, see below
- Included - uncheck to hide this trigger from the controller's Web Interface and Director
- Enabled - uncheck to prevent the Trigger from running
- Parameters - the data required for each Trigger type, varies by type so refer to the appropriate Trigger descriptions. Note that if a parameter only has one option (e.g. only one timeline in the project), then it will be selected by default.
Inhibiting a Trigger
For testing purposes it is sometimes useful to inhibit one or more Triggers to examine more clearly the operation of others. A Trigger can be inhibited by unchecking the Enabled box in the Trigger configuration, the row details will be displayed in a grey .
Hiding a Trigger
By Default Triggers are available to be viewed and fired from various locations, including the Default Web Interface, and Director. To prevent triggers from being visible in these locations, they can be hidden using the Included checkbox within the Trigger properties.
Trigger Numbering
Under most circumstances the trigger numbers have no bearing on the operation of the project file. Users should be careful when changing trigger numbers if the controller API is utilised in a project.
It can be desirable to change the numbering of Triggers such that they are continuous through the project once all triggers are created and put in order (see below). This can be achieved by manually changing the Trigger numbers in the trigger properties or:
- Selecting multiple triggers
- Right-clicking on a selected trigger
- Choosing Renumber triggers...
In the popup window, the Starting number can be set, e.g. if a set of triggers relating to a section of the project should be together in the 10xx range.
The selected triggers will be numbered incrementally from the starting number in the order that they are present in the trigger list.
Trigger order & matching
The order in which Triggers are displayed in the Trigger Management Area is the order in which they are tested by the system. Once a Trigger is successfully matched then, if "Absorb on match"is checked, no further Triggers are tested for that event; the event is absorbed. Thus this Trigger order is important, particularly when using Conditions.
If you had two identical Triggers in your show then, assuming they had no Conditions, only the first one encountered would ever be matched. However, if you add a Condition to the first Trigger then it will only match when the Condition is true, and when it is false the second Trigger will match instead.
The ability to have the same Trigger have different results based on a Condition is very powerful. For instance you might have a single digital input that starts one timeline during the day and another during the night.
Changing the Trigger order
You can select and drag the Trigger up or down within the management area to redefine the order
Absorb on match
In some cases it is useful for a matched Trigger not to absorb the event and thus allow Triggers further down the list, so there exists the option to disable the default behaviour by unchecking the "Absorb on match" box for each Trigger as required.
Conditions
If you wish to constrain the Trigger with a Condition then use the New Condition button in either the Trigger Toolbar or the Condition Configuration area. Select the required type from the searchable dropdown menu, see Conditions.
Up to 32 Conditions can be applied to each Trigger in this way and you can select each one for configuration from the Trigger Management Area.
Configuring a Condition
- Type - the Condition type
- Negate - check to invert the operation of the Condition i.e. if the Condition does not match
- Parameters - the data required for each Condition type, varies by type so refer to the appropriate Condition descriptions. Note that if a parameter only has one option (e.g. only one timeline in the project), then it will be selected by default.
Changing the Condition order
To change the order in which Conditions are tested, select the Condition in the Trigger Management Area and drag it to the required location within the Trigger.
Actions
Every Trigger needs an Action, the thing to do, which you can add to a Trigger using the New Action button in either the Trigger Toolbar or the Action Configuration area. Select the required type from the searchable dropdown menu, see Actions.
Up to 32 Actions can be applied to each Trigger in this way and you can select each one for configuration from the Trigger Management Area.
Configuring an Action
- Type - the Action type
- Controller - the controller that will process the Action
- Parameters - the data required for each Action type, varies by type so refer to the appropriate Action descriptions. Note that if a parameter only has one option (e.g. only one timeline in the project), then it will be selected by default.
Changing the Action order
To change the order in which Actions are executed, select the Action in the Trigger Management Area and drag it to the required location within the Trigger.
Copying a Trigger, Condition or Action
Select the Trigger, Condition or Action to be copied in the management area and use the Copy option in the appropriate section of the Trigger Toolbar or right-click > Duplicate [Trigger, Condition or Action] to create a duplicate immediately below the current selection. When you duplicate a Trigger, the Conditions and Actions for that Trigger are duplicated as well.
To create a copy of an Action in a different Trigger, you can select the Action in the Trigger Management Area and drag it into the destination Trigger.
Deleting a Trigger, Condition or Action
Select the Trigger, Condition or Action to be deleted in the management area and use the Delete option in the appropriate section of the Trigger Toolbar or right-click > Delete [Trigger, Condition or Action] delete the current selection. When you delete a Trigger, the Conditions and Actions for that Trigger are deleted as well.
Trigger Filtering
To filter Triggers by their group, you can use the Filter... option in the Trigger Toolbar. The Filter toolbar will be shown:

You can filter Trigger by their Type or by their Group.
You can disable filtering by Type and Group with the appropriate checkboxes.
IO Module Editor
The IO Module editor allows you to add IO Modules to your project. These IO Modules (IOMs) are small snippets of code that allow your Pharos Designer system to interact with 3rd party devices, or add additional functionality into your project file that was only possible via scripting before.

Import... allows you to import an IOM file from your hard-drive. This is only really necessary when you have a custom IOM or have been sent one from Support.
Delete allows you to delete an IO Module from your computer.
NOTE: Deleting an IOM will remove it from your IOM file in Designer's default folder system, so will no longer be visible in further projects. If this was done accidentally, the IOM can either be re-downloaded or re-imported.
Update... allows you to update an existing IOM from a source file on your hard-drive. This is only necessary if you are using an imported, rather than downloaded, IOM.
Download... will open the Online IO Module Library, which povides access to all released IO Modules and released betas.
Module Instances are the IOMs that are currently active within your project. Each IOM can be run in multiple instances, which ringfences them all off from each other. For instance, the timer of one will not trigger another instance.
Instances can be created or deleted from within the toolbar.
Lua script editor
The Lua Script Editor allows you to edit scripts from Triggers, Conditions and Actions within Designer. The Script Editor is launched by pressing the Scripts & Modules button on the Trigger Toolbar, and selecting Scripts in the bottom pane:
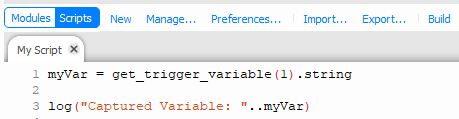
The main area of the editor is the code editor where you enter the source code of the script. The code editor will colour the Lua syntax to aid readability. Standard clipboard shortcuts and undo/redo are supported.
To create a new script for use in Conditions or Actions click New Script.
Scripts can be opened using the Open option and closed with the![]() on the Script Tab.
on the Script Tab.
To import a Lua script from an external file, use Import.
To save a Lua script to a file, use Export.
To compile the script and check for syntax errors, use Build. If there are errors in the script, they will be displayed at the bottom of the window.
Changes to scripts are saved automatically.
Find

Pressing Ctrl(Cmd) + F will open the find bar in the script editor.
This allows you to search for text within your script.
| Aa | If selected, the case must match |
| |Abc| | If selected, the whole word must match |
| .* | If selected, Regular Expressions can be used in the search box |