Scheduling
The Scheduling features allows you to run multiple Tasks at user-specified times, much like Real Time and Astronomical triggers in Pharos Designer. This allows you synchronise actions across different controllers and projects. Task Schedulers can be created by end users, who have the relevant permissions, from both a desktop browser and via mobile devices, without making changes to the project file.
If you use Real Time triggers in your project, then Cloud Scheduling can be used alongside these. There is no priority differences between Triggers in a controllers project file and Cloud Schedules, this should be considered when programming a project file.
Controllers don't store any Scheduling information locally - Schedules are sent to controllers as they are due to happen. Controllers must have an active connection to Cloud for Schedules to run.
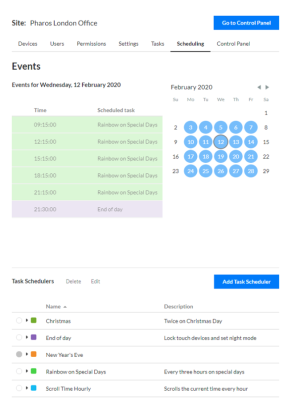
Once created, Scheduled Tasks appear in a user-friendly interface with a helpful calendar widget.
Scheduling’s time use the Cloud Site’s local time, not the Controller’s time. The Site location must therefore be set before Scheduling can be configured. To do this, navigate to the Site’s Settings tab.
Creating Task Schedulers
The following steps cover how to create a new Task Scheduler.
Click the 'Create' button above the Task Schedulers table.
Step 1
The first step of creating a Task Scheduler is to select the Tasks and Actions for the Scheduler to run. On the left hand side of the modal a user will specify the Actions and/or Tasks to run. Existing Tasks can be added to the Task Scheduler by selecting them in the 'Tasks' view. Tasks shown here are already created in the Site and will be run as usual when the Task Scheduler is ran.
Actions can be added where an existing Task does not cover the desired changes. Any Actions added here will be automatically added to a new Task when the Task Scheduler has been created. Rename this new Task using the hashed line text box above the Actions.
Select a controller on which the Action is to be run on from the drop down menu. Different controllers with different firmware versions may support different Actions. Click an action to add it into the new Task. Different Actions will have different configuration options. See Task Actions for all supported Actions across different firmware versions.
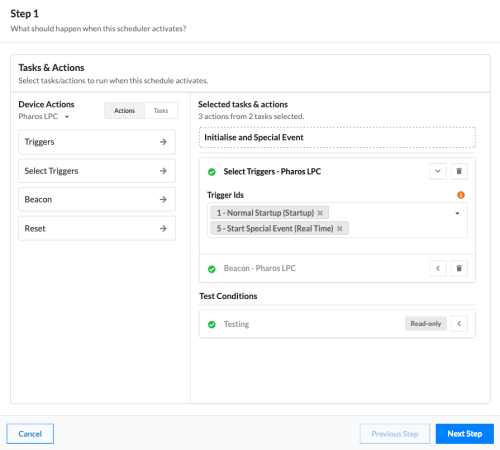
Once these are setup as desired click to move onto the 'Next Step'.
Step 2
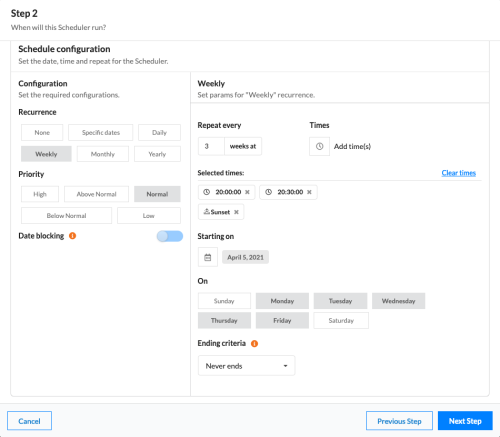
Next, select when the Task Scheduler is to run.
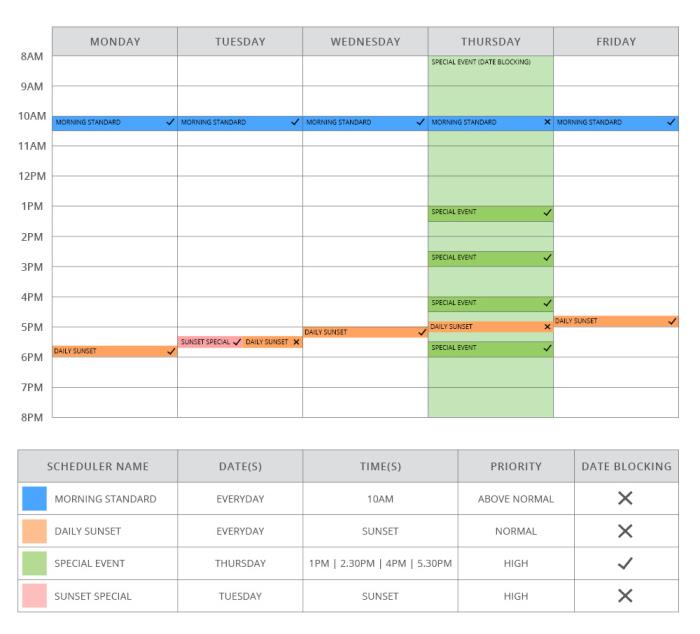
Select a priority for the Task Scheduler and if date blocking should be enabled. Priority will only effect other this and other Task Schedulers, not any timeline priorities in the controllers programming and only applies to exact time matches. Date blocking will prevent any occurrences with a lower priority from running at any time on any date on which this scheduler occurs. Otherwise, if date blocking is off, priority only has an affect on occurrences with exactly the same start time.
Click here for a visual example of Date Blocking![]()
Select a recurrence for the Task Scheduler:
None
No Schedule configuration will be added but can be added later.
Specific dates (default)
Manually select each date the Task Scheduler is to run on. Dates can be removed individually by clicking the 'x' in the 'selected dates' section.
Daily
Specify the amount of days between each recurrence.
Weekly
Specify the amount of week between each recurrence. Choose a start date and which days of the week should be included in recurrences.
Monthly
Specify the amount of months between each recurrence. Choose a start date from which the monthly recurrence will also be calculated, use the Advanced Options to adjust the recurrence date to special configurations.
Yearly
Specify the amount of years between each recurrence. Choose a start date from which the yearly recurrence will also be calculated, use the Advanced Options to adjust the recurrence date to special configurations.
Daily, Weekly, Monthly and Yearly recurrence options have the following ending criteria:
On a date & time
No occurrences will run on or after the time specified
After n occurrences
Occurrences include multiple time selections, so in the example above there are 3 occurrences per day
Never ends
Will last indefinitely
Add Times to the schedule. When adding times there are a few options to help deal with multiple time occurrences:
Simple
Specify a single time and click 'confirm' to add it to your 'selected times' section.
Recurring
Specify an Interval the start and end time. The preview will show all of the times that are about to be added. Click 'confirm' to add the times.
Astronomical
Select a Sunrise or Sunset time with an optional offset. Click the '+' for whichever option is applicable where a preview will be generated. Click 'confirm' to add the times to the Schedule. A maximum of 5 astronomical times can be provided per Schedule.
Time Mask
Specify the hours, minutes and seconds on which a Scheduler is to run, all instances of those times will be previewed. Click 'confirm' to add the times.
Selected times can be removed by pressing the 'x' in the 'selected times' section, or choose to clear all times with the 'Clear times' option.
Once these are setup as desired click to move onto the 'Next Step'.
Step 3
This step allows you to adjust the Task Schedulers Name, Description and occurrence colour. A preview of the Actions, Dates and Times is also shown here.
Once the Task Scheduler is setup as desired click to 'Create Scheduler'.
The Task Scheduler will then be created, along with a new Task if Actions were specified and a default Schedule will be added to the Task Scheduler. Once created used the Events Calendar to view the active occurrences.
Editing Task Schedulers
All editing of Task Scheduler is done from the Task Scheduler table.
Hover over the Task Scheduler colour, Name and Description to edit inline.
Task Schedulers can be enabled or disabled with the toggle in the Task Schedulers table row. Occurrences will still be shown in the Events Calendar, but will not run.
Use the drop down arrow for the Task Schedulers table row to expose its Schedules and associated Tasks. Schedules can be added, edited and deleted from the top table. Tasks can be added or removed by clicking the 'Edit' button for the lower table. Tasks can be edited in the Tasks tab.