This window need only be used if there are DALI ballasts in the project and one or more RIO Ds
The Digital Addressable Lighting Interface (DALI) is a digital serial control protocol for architectural lighting. Developed by Philips Lighting it has become a standard: IEC 60929. DALI differs from DMX in a number of important ways:
As a result the DALI protocol is not suitable for rendering effects and media, programming is restricted purely to recalling lighting levels via the Set Level and DALI Scene presets, see DALI presets.
Each RIO D, TPC with EXT
When you add a RIO D, TPC with EXT
Up to 100 DALI interfaces can be added to a project, but the following restrictions apply:
Each DALI interface is configured separately, use the pull-down on the DALI toolbar to select an interface for configuration:
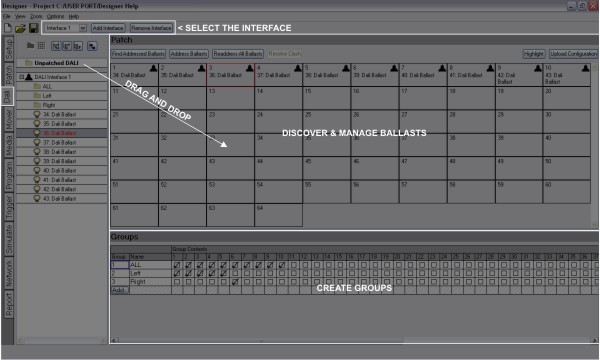
The top pane of the DALI interface window displays the 64 real ballast address cells, the bottom pane the group membership matrix. The device commands are available to manage the ballasts on each DALI interface.
IMPORTANT: Designer must be connected to the Controllers with RIO Ds
A DALI ballast internally stores its address, this is a number between 1 and 64. It is also possible that the ballast has never been addressed so it does not have an address. These commands are used to discover and address DALI ballasts:
This queries the ballasts attached to the device and reports all addressed ballasts found, an icon is added to each address cell when the corresponding ballast has been found.
This finds all ballasts without an address and randomly assigns them a free address. It will not change the address of any already addressed ballasts.
This will clear the addresses of all ballasts and then assign every ballast a random address.
It is possible that two ballasts can have the same short address. If that happens the ballasts clashing are shown with a red icon. The resolve clash button will move the clashing ballasts to a random address that is unused by any other ballast.
Send all emergency ballasts a command to indicate their address on the multicoloured LEDs on the fixture. Whilst this is enabled the command will be sent every 10 seconds.
The ballast is readdressed to the target cell. If the target cell was occupied then the ballasts should swap addresses although this has not been found to be terribly reliable.
Select an address cell (containing a ballast icon) and press Highlight to bring this ballast to full level, select another cell to highlight instead or press Highlight again to turn off.
When you add DALI fixtures to your project plan in setup these "abstract" ballasts are assigned to the Unpatched DALI group in the Browser and must be mapped to real DALI interfaces and ballasts using this window.
Once you have discovered and addressed all the real DALI ballasts for each interface (if more than one) you can then patch your DALI fixtures to them simply by dragging them from the Unpatched DALI group onto the required interface and address cell. As each DALI interface is assigned DALI fixtures, the Browser refreshes to reflect these changes. The Unpatched DALI group will become empty once all the DALI fixtures in the project have been patched.
It is of course possible to patch your DALI fixtures blind in advance of being connected to the real ballasts. The patch is stored with the project data and not on the DALI ballasts.
Unlike other groups in Designer, DALI groups are a property of the real DALI interface not an abstract collection of fixtures, and there can only be 16 DALI groups per interface. The matrix on the lower pane of the window allows you to add and define groups for each interface:
The DALI group is added to the Browser and group configuration data ready to be uploaded into the ballasts.
The DALI group is removed and the group configuration data updated ready to be uploaded into the ballasts.
If groups have already been programmed onto the DALI fixtures you can press the Discover Groups button to automatically populate group information from the fixtures on the interface.
In Designer's implementation, DALI scenes are common across DALI interfaces, use the pull-down on the DALI toolbar and select Scene Setup for programming:
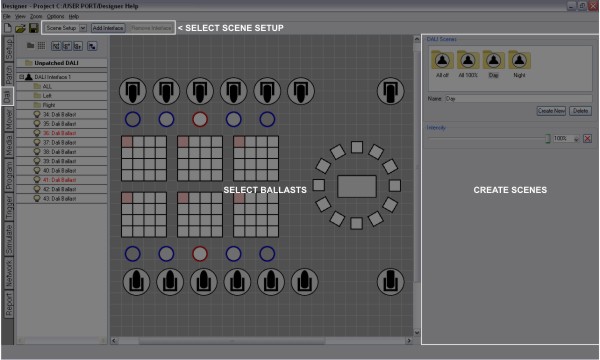
The Browser and project plan are displayed so that you can select the DALI fixtures and groups. On the right are the DALI scenes folder and the Intensity controls.
There can be up to 16 DALI scenes which can contain programming for some or all of your DALI fixtures, even if spanning different DALI interfaces. In general you should include programming for all your DALI fixtures in each scene since you can determine when creating timelines which fixtures or groups should run the scene by dropping the DALI scene on the appropriate timeline row, the choice is yours though.
The DALI scene is added to the folder and scene configuration data is ready to be uploaded into the ballasts.
The DALI scene is removed and scene configuration data updated ready to be uploaded into the ballasts.
The DALI scene is edited and scene configuration data updated ready to be uploaded into the ballasts.
The DALI scene is edited and scene configuration data updated ready to be uploaded into the ballasts.
Emergency DALI ballasts are set-up in the same way as standard DALI ballasts and support Highlight and Re-Addressing.
Emergency tests may be scheduled for all emergency ballasts in a project via the Emergency Ballast Tests tab on the right of the DALI window. You can override project settings on a per interface basis by using the emergency settings in the Interface Properties tab. Function and Duration tests can be scheduled independently of each other on a daily, weekly, monthly or yearly basis. The time of day that the tests run can also be specified. Choosing to test alternate ballasts will test every other patched ballast - the remaining ballasts will then be tested once the initial test is complete.
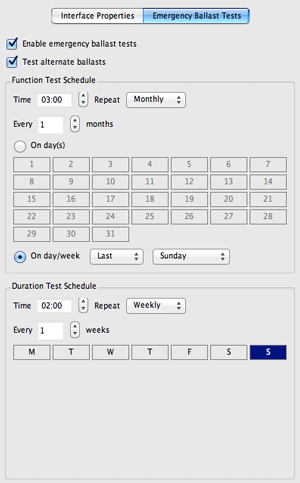
Test information is stored on the memory card of the controller responsible for that interface. This information can also be viewed via the web interface.
Specify a ballast's Prolong time in the Setup tab.
Once you have configured all your DALI interfaces and programmed all your DALI scenes you must upload the configuration to each DALI interface in turn so that this data can be stored on the DALI ballasts themselves. Select an interface using the pull-down on the DALI toolbar and press the Upload Configuration button, a progress bar will track this rather slow procedure.