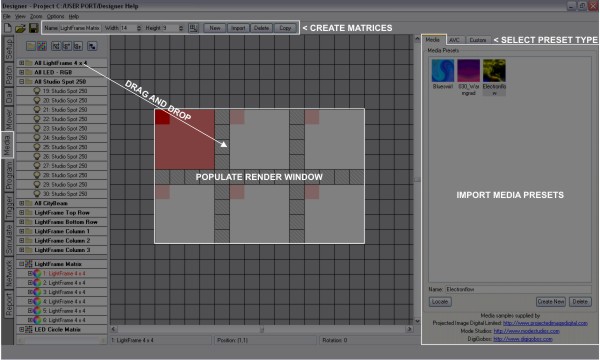
This window serves two purposes: to edit or manually create Pixel Matrices of fixtures for use as a media playback screen, and to import Media
The window comprises 3 sections: On the left is the Browser, in the middle the Pixel Matrix editing area, and on the right are the Presets panes.
Typically you will place fixtures to mimic as closely as possible their actual deployment, the software will compensate for gaps and irregularities in a matrix so that media will be rendered correctly. Fixtures that have been rotated on the Plan during Setup will be placed on the Matrix using this rotation although this is only relevant to compound fixtures. Such fixtures can be rotated separately for each Matrix by dragging them around when the cursor indicates rotate mode, note that the first element of a compound fixture is displayed a darker pink for easy orientation.
To remove a fixture from a Matrix right-click on the fixture on the plan and select Remove Fixture.
To break a composite fixture apart into individual pixels right-click on the fixture on the plan and select Break Fixture.
You may create as many Matrices as you like and any fixture can be used as a “pixel” in any Matrix but clearly those that can colour mix are the sensible choice, RGB LEDs being by far the best due to their large colour gamut and fast response. That being said, the software will render coloured media as grey scale on intensity only fixtures.
Use the Crop Render Window button to trim the Render Window to fit the extents of the fixture array.
Manual sizing of the Render Window is provided by typing in appropriate Width and Height size values and it is perfectly allowable to undersize the Render Window to achieve effects such as picture-in-picture or oversize it to concentrate on a particular area of the imported media.
You can use the Import button to import pixel layout from a CAD application via a CSV file, see pixel matrix file format.
Select the Media tab. Media presets can only be played on LPC Pixel Matrices.
Media is imported by clicking Create New in the Media Presets pane. A dialog will open as shown above for you to browse to wherever your media files are located, enable Thumbnails view to preview them. Designer supports most common media files, indeed anything that QuickTime supports, and it matters not at all the resolution of the media clips as the software will up/down-scale as required when the Media Preset is placed on a Matrix during programming. In short, no media preparation should be required. The first frame is used as their thumbnail in the directory, they can be named using the name textbox at the bottom of the directory pane and they can also be deleted.
Imported Media is automatically resized to fit a Pixel Matrices’ Render Window, the hatched area of the Matrix. Only fixtures/pixels within this Render Window will receive the media which is why Render Windows should typically be cropped (see above) to force the media to fit onto just the fixtures.
Designer ships with sample media clips kindly provided by Projected Image Digital, Mode Studios and Digigobos. Four samples are installed with the application, the others reside in the Sample Media folder on the CD. Links are provided from the Media window to peruse these vendors’ websites to obtain additional media for your project.
Select the Media Slots tab. Media slots are placeholders for Media Presets and can only be played on LPC Pixel Matrices.
Create a Media Slot by clicking Create New in the Media Slots pane. A Media Slot can be renamed using the name text box underneath the Media Slots directory. The selected Media Slot can be deleted by clicking the Delete button.
The content for Media Slots is created using a separate utility application: Pharos Dynamic Media Manager. When you have finished creating your Designer project, go to File > Export for Media Manager to save details about your Media Slots to a .pmm file. Create a new project in Dynamic Media Manager and import the .pmm file. You can now program content onto each media slot. It is possible to import .pmm files from multiple Designer projects into a single Dynamic Media Manager project in order to aid media management for large installations. Please refer to the Dynamic Media Manager help for further details.
Whenever you make a change to the fixtures, patch or programming in your Designer project you must go to File > Export for Media Manager and then import the generated file into your existing Dynamic Media Manager project.
When you've exported your media from Dynamic Media Manager you can upload it to your controllers using Pharos Installation Manager. Please refer to the Installation Manager help for further details.
Pharos Dynamic Media Manager and Pharos Installation Manager are free to download from our website.
Select the AVC tab. AVC presets can only be played on AVCs, see Working with the Audio Visual Controller.
You must prepare the video and audio clips you want to use on the AVC in this pane. To add a new clip click Create New and browse to a suitable media file containing video, audio or both.
Should the media file(s) subsequently be moved, renamed or deleted such that the preset path(s) no longer valid then a warning icon will be displayed over the thumbnail.
Designer can import a wide variety of video formats and convert them into the video format used on the AVC. However, the AVC format is based on MPEG2 and for best quality results - and fastest conversion - we recommend preparing content as standard definition MPEG2. All video content must have either PAL (25fps) or NTSC (29.97fps) frame rates - Designer will not accept content with other frame rates, but it will scale video prepared for different resolutions.
Designer can also import a wide range of audio formats including AC3 (used on DVDs), WAV, and MP3. To add audio to an existing clip, make sure the clip is selected and click on the button next to the "Audio Path" box. You can then browse to the audio file and select it.
If the video and audio need to be synchronised (i.e. audio is a soundtrack for the video) then you should select "Audio synced" to ensure they are always locked together. You can specify an audio offset to correct for any time delay between video and audio. If the audio and video can run independently (e.g. audio is a music track of a different length to the video) then make sure "audio synced" is not selected and they will loop independently.
Select the Custom tab. Custom presets can only be played on LPC Pixel Matrices.
Custom Presets use a Lua script to define an effect that can be played back on a Matrix. You can use this to create effects that are not available as standard in Designer.
To create a new Custom Preset, press Create New in the Custom tab on the right. This will open a script editor dialog:
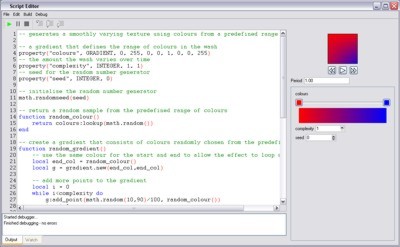
The source editor initially shows the framework of a custom preset. You can either enter the source yourself, or you can load the source from a file using File > Import. Designer provides sample scripts which are located in Program Files at \Pharos\Designer\resources\scripts\custom_presets.
After editing or importing a script, you compile it by pressing F7. If there are any errors in the script, they will be reported in the Output tab. If there are no errors reported, it is advisable to run the script to preview the preset. To run the script, use Debug > Run (F5). If the script takes a long time to run, or appears to have got stuck in a loop, use Debug > Stop (Ctrl+F5) to stop execution.
IMPORTANT: When working in the script editor, if your script does have an infinite loop, you are able to stop it executing by pressing Debug > Stop (Ctrl+F5). However, outside of the debugger, there is no such way to stop the execution of a badly-behaved script. This will result in Designer locking up and will have to be shut down manually. You must ensure that your scripts do not have such errors in them.
A preview of the preset will be generated and shown on the right of the script editor. You can start and stop the preview and step forwards and backwards with transport controls below the preview. Altering the period below the preview and pressing Debug > Run (F5) again will generate the preview again with the specified period.
If the preset defines any properties, after the script is successfully compiled, suitable editors for these properties will be displayed below the preview. You can change the values of these properties and rerun the script using Debug > Run (F5) to observe the effect of those properties in the preview.
Once you are happy with the preview, close the script editor. The preset can now be placed on Matrices on a timeline.
You can edit the source of the custom preset script again by selecting it in the Custom tab on the Media pane and pressing Edit. If you edit a preset that is already used on a timeline, any changes you make will be applied to everywhere where the preset is used.
Refer to the script editor documentation for more information on editing scripts, and the custom presets programmers guide for help on creating a custom preset from scratch.