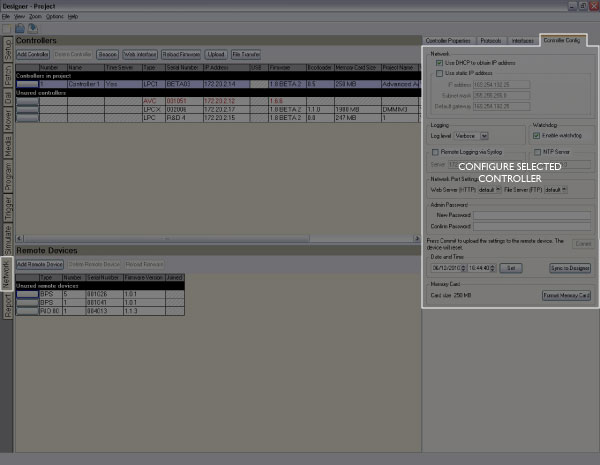
With a Controller selected, choose the Controller Config tab:
Uniquely, these settings are stored on the Controllers themselves, not in the project or as part of the upload. They can be changed here or by using the web interface. The Controller does not have to be associated with a project Controller to do so.
Use these fields to set a static IP address for the Controller, by default the Controller is set to receive an IP address from a DHCP server.
If the IP settings have been stored on the Controller's memory card as a "TPC.cfg" or "LPC.cfg" file then these fields will be greyed out.
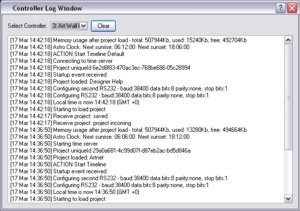
Select the verbosity (detail) of the log that can be viewed either via the web interface or from within Designer using View > Controller Log and selecting a Controller (which can be connected via Ethernet or USB):
Check this to enable the internal watchdog that will reset the Controller automatically in case of a software crash as a result of either a coding error (“bug”) or a random electromagnetic event such as a power brown-out or spike, nearby lightning strike or static discharge. A startup trigger will be required to determine what the Controller should do after such a reset, see triggers.
Check this to enable logging to the specified IP address. Note that there is a performance penalty to pay for using Syslog so this should only be enabled for debugging.
Check this and enter the IP address of the appropriate Network Time Protocol (NTP) server. Note that Controllers with DHCP enabled will also synchronise with a suitably configured DHCP server.
The ports opened by the Controller for access to the web server using HTTP and for access to the FTP server for file transfer can be manually configured. This can be useful if there are several Controllers in an installation and remote access is required via a router setup for port forwarding to each Controller.
By default the Controller uses port 80 for the web server and port 21 for the FTP server.
Enter a password to protect the Controller from unauthorised access. Once a password has been set it will be required to Upload, Reload Firmware, change the Controller Configuration (these settings) or open the Control and Configuration sections of the web interface.
All Controllers have an internal realtime clock which is battery backed and so will operate even when the Controller is not powered. Whilst the internal realtime clock is accurate, the use of a Network Time server of some sort (NTP, DHCP) is recommended where possible (see above).
The Date and Time fields display the current settings of the selected Controller's realtime clock. Only the designated Time Server need be accurate as any other networked controllers will automatically synchronize their realtime clocks to the Time Server.
Note that the project location settings include the correct GMT offset so, if using these location settings, you should set the time here to GMT not local time or the offset will be doubled.
The capacity of the Controller's memory card is displayed here with the option to format the card if required, press "Format Memory Card". Formatting the card will erase all project data and so an upload will be required to restore normal operation.
Since the AVC uses the card aggressively, best performance requires the memory card be formatted in a particular way. It is therefore recommended that you format the memory card when starting a fresh AVC project or when inserting a new card.
After a reset, LPCs look for a file called "LPC.cfg" on the memory card before using its current settings. TPCs look for a file called "TPC.cfg". You can use a text editor (e.g. Notepad) to create this file and copy it to the memory card to force the issue, useful for transferring the IP settings on the card with the project data. The format of the file needs to be:
| ip 192.168.42.56 255.255.255.0 192.168.42.250 |
| ntp 192.168.42.1 |
| syslog 192.168.42.8 |
| loglevel 3 |
The first line is the IP Address, Subnet Mask and Default Gateway. The other lines are optional and define the NTP and SYSLOG IP addresses and the LOGLEVEL setting.
Using the TPC.cfg or LPC.cfg file to store the Controller's configuration on the memory card allows a Controller to be swapped, in case of failure for example, by just moving the memory card into another Controller.