Triggers
A Trigger is an event that the controller receives which can then be used to tell the controller to do something. It is the IF part of an IF THEN statement.
Example:
 IF (Real Time is 10:00:00) THEN (Start Timeline 1)
The Real Time Trigger will fire whenever the built in Real Time clock tells the controller that it is 10:00:00, and the controller will then Start Timeline 1.

There are many different trigger types available, each linking to a different internal or external triggering situation.
 Clock/Calendar Triggers
Clock/calendar triggers use the controller's real time clock to fire triggers based on the current time, or astronomical or lunar events such as Sunset or the Full Moon. These triggers are often used when a schedule is required for the project. This could be as simple as starting a light show at sunset and stopping it at sunrise.
Real Time
The Controller has an internal, battery-backed real time clock. In a project with multiple Controllers only one Controller is set as the Network Primary (see Controller association), use the configuration settings to determine what sort of real time event will be matched, for example 5 minutes past every hour or at noon on a specific date.
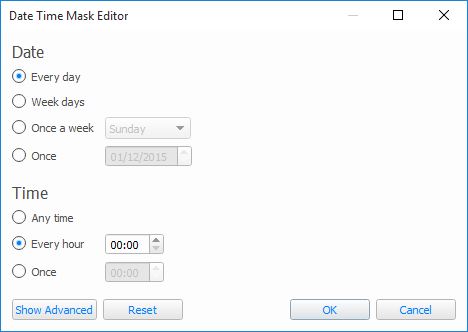
The standard dialog allows you to deal with the most common cases, including one-off events or events that recur hourly, daily or weekly. Note that the maximum resolution of real time events is 1 second, so an "Any Time" trigger will fire every second during the specified date range:

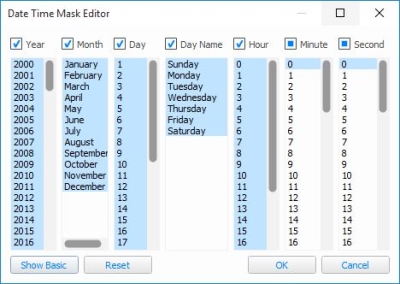
There is also an advanced dialog that allows you to specify a precise mask of when the trigger should fire, using a combination of year, month, day of the month, day of the week, hour, minute or second. Highlighted values are included in the mask and make sure all values are highlighted in any column you don't care about. The trigger will fire at all times that match the specified mask in all columns - so no column should be blank or the trigger will never match:
Further information about the use of the real time clock can be found in the conditions chapter.
In the Network view, a Controller properties option exists to "execute real time triggers on startup". This will ensure that all real time triggers are executed from a user-specified time to the current time to reinstate the correct playback state in case the Controller is restarted for some reason (e.g. power loss, watchdog or remote reset).
NOTE: Real Time triggers are only tested by the Network Primary and then shared over the network so any conditions are tested on the Network Primary only.
Astronomical
The Controller is also equipped with astronomical clock algorithms which automatically generate the correct sunrise, sunset, dawn and dusk times for the location of the installation (see project properties). Use the configuration pane to select between sunrise, sunset, dawn or dusk and to specify an offset, negative or positive, in minutes. A negative offset will be the specified number of minutes earlier, and a positive offset will be later.
Two versions of dawn and dusk are offered, using the two definitions of twilight: civil and nautical. Please see Wikipedia for an explanation of these terms.
A Controller properties option exists to ensure that all astronomical triggers are executed from a user-specified time to the current time to reinstate the correct playback state in case the Controller is restarted for some reason (e.g. power loss, watchdog or remote reset).
NOTE: Astronomical triggers are only tested by the Network Primary and then shared over the network so any conditions are tested on the Network Primary only.
Lunar
As well as astronomical triggers the Controller uses lunar clock algorithms to calculate the lunar phases based on the location of the Controller (see project properties).
The lunar events are new moon, first quarter, full moon and third quarter. Use the configuration pane on the right to select the phase.
NOTE: Lunar triggers are only tested by the Network Primary and then shared over the network so any conditions are tested on the Network Primary only.

A playback trigger is fired by an event involving a timeline or scene, or by the controller booting. These could be used to start a particular timeline when the controller boots, or to always start a timeline when another has finished.
Startup
The startup trigger determines what the Controller should do after power up or reset. There are no configuration options.
Timeline Started
A timeline starting (generally as a result of a trigger or the timeline looping) can be used as a trigger. Use the configuration pane to select which timeline, or select 'Any' and choose a playback group to trigger when any timeline in that group is started. Tick 'Ignore Loops' to prevent the trigger firing when a looping timeline restarts.
Timeline Ended
A timeline reaching the end of its programming can be used as a trigger. Use the configuration pane to select which timeline, or select 'Any' and choose a playback group to trigger when any timeline in that group ends. For a looping timeline, this trigger will fire every time the timeline loops.
Timeline Released
A timeline releasing can be used as a trigger. Use the configuration pane to select which timeline, or select 'Any' and choose a playback group to trigger when any timeline in that group is released. Tick 'Ignore Loops' to prevent the trigger firing when a looping timeline releases.
Timeline Flag
Any timeline can have one or more flags placed on the time bar (see working with timelines) to act as triggers. Use the configuration pane to select which timeline and the flag within that timeline, or select 'Any' and choose a playback group to trigger on any timeline flag on any timeline in that group.
Timeline can be set to any to match any flag in the project. The timeline number will be captured as a variable.
Flag can be set to any (with a specified timeline) to match any flag in that timeline. The time of the flag (in milliseconds) will be captured as a variable.
Scene Started
A scene starting (generally as a result of a trigger or a timeline preset being used) can be used as a trigger, use the configuration pane to select which scene, or select 'Any' and choose a playback group to trigger when any scene in that group is started.
Scene Released
A scene releasing (generally as a result of a trigger or a timeline preset being used) can be used as a trigger, use the configuration pane to select which scene, or select 'Any' and choose a playback group to trigger when any scene in that group is released.
Interactive Triggers are triggers which respond to an input from a human (generally). These include push buttons on the Pharos BPS and Touch Device and other Touch Device controls. You would use these triggers if you have a Touch Device in your project and need to act upon interaction with the controls on the interface.
Soft Trigger
This trigger type is provided for triggering from the web interface, there are no configuration options.
Digital Input
The LPC and TPC with EXT have 8 digital inputs which can be used as triggers, either to detect a voltage or a contact closure driving with an "active high" signal. More information on High and Low for Contact Closure can be found here. Use the configuration pane to select which Controller (Any or a particular LPC or TPC with EXT), which Input (1 through 8) and the polarity of the logic - select Low for contact closure or when driving with an "active low" signal, select High for driving with an "active high" signal.
The Input can also be set to Low Held or Low Repeat. These will use the Held Timeout and Repeat Interval settings to fire the trigger once the Input has been low for the Held Timeout or every Repeat Interval after the Input goes Low.
The Clicked option can be used to fire the trigger when it changes to Low and back to High. The Clicked event will only occur if the input is toggled before the Held timer occurs, which can be set independently for each Remote Device in the Network view. More information can be found on the Held timer here.
To receive a digital input from a Pharos Remote Device, change the Device to RIO 84, RIO 80 or RIO 44 and set the RIO number, or leave as Any. The RIO 84 has 8 inputs, as does the RIO 80, and the RIO RIO has 4 inputs.
The inputs on the LPC and TPC with EXT hardware and the RIOs can also be configured as analog inputs in the Network Mode.
Analog Input
The revised LPC and TPC with EXT hardware has 8 inputs that can be configured as digital or analog inputs in the Interfaces tab of the Network view. The RIO 84, RIO 80 and RIO 44 have inputs that can be configured as digital or analog inputs in the Remote Devices tab of the Network view.
Use the Controller and Input settings to specify which Controller’s analog input should be considered the input source. Alternatively, leave the Input set to Any to match any of the inputs of the Controller and to capture the input as a variable. To use a RIO's input as the input source, change the Device from Local and select the RIO number, or leave this as Any.
Now you should specify the range of voltage to trigger on. You can choose whether to trigger every time the voltage changes within the specified range ("Changes in range"), or to only trigger when the voltage enters the specified range ("Enters range"). "Enters range" is generally more useful when you are using analog inputs to trigger timelines, but "Changes in range" would be required if you were using an analog input as a variable passed to a Set Intensity action to control the intensity for a group.
The voltage range of a Controller's or RIO's analog input can be configured in the Network view. The smallest measurable voltage change is 0.25V.
BPS Button Event
The BPS has eight buttons which can be used as triggers.
Use the configuration pane to select which Controller should process the trigger. Select the BPS, button number (or leave as Any - see variables) and the type of button event (Press, Held, Repeat, Release, Clicked). Setting the button number to Any will capture the pressed button as a variable.
Touch device triggers will respond to any touch device in the project. To respond only to a particular touch device, use the 'Touch Device' field to set the type and number of the touch device you're interested in. To specify a particular TPC, enable the 'Trigger Controller Edit' project feature, set the trigger's controller to your TPC and set 'Touch Device' to 'Local'.
Touch Button Event
Whenever a button in a Touch Device user interface is touched, triggers of this type will be checked for a match.
The Button field should be set to the Control Key of the button you're interested in - this is a property of buttons that is set in Interface. Either pick a control key from the list, or type it in.
The Event defaults to 'Click', which is a complete press and release touch action. Other options are Press, Release, Held and Repeat, like the BPS Button trigger.
Touch Slider Move
Whenever a slider in a Touch Device user interface is moved, triggers of this type will be checked for a match.
The Slider field should be set to the Control Key of the slider you're interested in - this is a property of sliders that is set in Interface. Either pick a control key from the list, or type it in.
Touch Colour Change
Whenever a colour picker in a Touch Device user interface is touched, triggers of this type will be checked for a match.
The Picker field should be set to the Control Key of the colour picker you're interested in - this is a property of colour pickers that is set in Interface. Either pick a control key from the list, or type it in.
Touch Page Change
Whenever the current page of a touch device user interface is changed, triggers of this type will be checked for a match.
The 'Page' field should be set to the name of the page you're interested in - this is a property of pages that is set in Interface. Either pick a page name from the list, or type it in. You can also specify whether you want the trigger to fire when entering or leaving that page.
Touch Keypad Code
When the Enter key on a keypad is pressed, triggers of this type will be checked for a match.
The Keypad field should be set to the Control Key of the keypad you're interested in - this is a property of keypads that is set in Interface. Either pick a control key from the list, or type it in.
Touch Inactivity
Whenever the sleep/awake state of a touch device screen is updated, triggers of this type will be checked for a match.
Choose whether to trigger after a period of inactivity or when the Touch Device becomes active (is touched) again.
The timing for when the touch device is set to inactive can be adjusted in the Device Properties area of the Network tab.
Protocol Triggers are generally triggers which include communication with another device using a command protocol such as Serial (RS232/485), Lighting control data (DMX/eDMX/DALI) and Ethernet (TCP/UDP). These would be used when another device is used which can communicate with one of these protocols, and they could be used to start a timeline when a particular string is received from another device, or to set the intensity of a group of fixtures based on an Audio input.
Protocol Command triggers can be used when a specific message is being send to a controller by another control system or device. These could be an ASCII string sent over Serial which should cause a timeline to start or a MIDI message from a Show control system to turn down the house lights in a performance space.
Serial Input
RS232 EIA-232; an industry standard communications protocol for computing and telecommunications equipment. remains a very popular protocol for interfacing equipment and the RS232 port of a Controller or Remote Device can be configured to support most common data formats. RS485 EIA-485; an industry standard communications protocol for computing and industrial equipment. is a more robust alternative to RS232 (better noise immunity, longer cable lengths and faster data rates) and is a widely supported protocol. A Controller or Remote Device can be configured to receive RS232 full-duplex or RS485 half-duplex in the Network view, see Controller interfaces and Remote Devices. A TPC with EXT can receive RS232 full-duplex.
To receive serial from a Controller's serial port, leave Device as Local and use the Controller setting to specify which Controller's serial port should be considered the input source.
For the old LPC Xs with 2 serial ports, the Port setting selects which of the two RS232 ports should be the input source.
Alternatively, set the Device to a RIO and select the RIO number.
Now define the string of input characters to be matched as the trigger. There are three formats in which serial strings can be entered:
Hex A series of hexadecimal characters (0-9, a-f, A-F) where pairs of values are interpreted as a byte. Decimal A series of decimal characters (0-255) separated by "." characters. ASCII A series of ASCII characters. The special characters '\n' for new line, '\r' for carriage return, and '\t' for tab are supported. Additionally, each byte can be replaced with a wildcard to match a range of input characters and these wildcards can even be captured as variables to determine the trigger's action.
Ethernet Input
Use the Controller setting to specify which Controller should process the Ethernet input. Select the Ethernet Source (see Controller interfaces) and press Edit to define the string of input characters to be matched as the trigger in much the same way as RS232 (see above).
NOTE: The maximum input string size is 1.5kB. Any input larger than this will result in a second trigger being fired.
MIDI Input
MIDI "Musical Instrument Digital Interface"; an industry standard communications protocol for musical instruments. is another very popular protocol for interfacing equipment and the MIDI input trigger allows you to define, via a convenient MIDI Message Builder, the type (Short message, MIDI Show Control or Extended) and command string that is to be matched as the trigger. Variables can be captured to determine the trigger's action.
Use the Controller setting to specify which LPC's MIDI port should be considered the input source. To use the MIDI port on a RIO A, set the Device to RIO A and specify the RIO A number, or leave this as Any. In this case, the RIO number will be captured as a variable.
Press Edit to open the Message Builder:
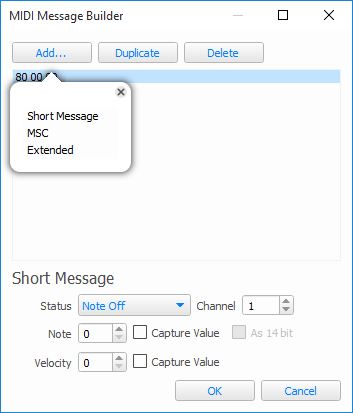
Press Add, select one of the three message types and then the specific command and variables.
Press Delete to delete a command string.
The resulting hexadecimal string will be constructed automatically and displayed in the window for reference with question marks ("??") indicating undefined characters in MIDI Show Control (since we do not know in advance how many characters will be captured) or <c>, <d> and <x> as appropriate for Short and Extended messages.
Press Ok to finish.
A comprehensive guide to MIDI is beyond the scope of this document, see the MIDI Manufacturers Association for more details, and the manual for the equipment to be interfaced will also certainly be an invaluable reference.
Controller Online
Use this trigger if you wish to act upon the detection of a Controller.
Use the configuration pane to select the Controller's identification number (or leave as Any).
NOTE: This trigger is intended for use in multi-controller projects and will not be fired when the network primary controller itself receives power. Projects requiring this functionality should instead use the Startup trigger.
Controller Offline
Use this trigger if you wish to act upon the loss of a Controller.
Use the configuration pane to select the Controller's identification number (or leave as Any).
Remote Device Online
Use this trigger, not the Startup trigger (which will fire before the Remote Devices can be detected), if you wish to act upon the detection of a Remote Device, for example to configure it with settings other than its defaults.
Use the configuration pane to select which Controller should process the trigger and select the Remote Device's type and identification number (or leave as Any - see variables).
Remote Device Offline
Use this trigger if you wish to act upon the loss of a Remote Device, for example to enter a fail safe state and issue a warning.
Use the configuration pane to select which Controller should process the trigger and select the Remote Device's type and number (or leave as Any - see variables).
Live Video Signal
Use this trigger to act upon the presence or absence of Live video.
Use the configuration pane to select which Controller should process the trigger and select the Event (Signal lost/Signal found).
Cloud Connection State
Use this trigger if you wish to act upon the connection or disconnection of a controllers Cloud Site. The current status of a controllers connection to a Cloud Site is shown on the home page of the web interface.
RDM Poll Finished
Use this trigger if you wish to act upon the completion of an RDM poll. This trigger captures variables - see variables.
DALI Triggers are specifically used to trigger based upon messages travelling on a specified DALI bus. This allows integration of a Pharos Controller with another DALI controller, so that a timeline for some DMX fixtures can be started at the same time as a DALI command is sent.
DALI Input
RIO D, RIO D4 or TPC with EXT required.
Use the trigger's Interface property to select which DALI interface to use for triggering.
The RIO D and TPC with EXT snoop the DALI bus and so the trigger can be set up to respond to any DALI commands:
- Command - select Direct Level (0-254), Recall Scene or Relative Level
- Address - select All, Group (0-15) or Ballast (1-64)
- Min/Max - select the level to match for Direct Level triggering
- Scene - select the scene (1-16) for Scene matching
- Type - select the type of Relative Level command to match
The RIO D, RIO D4 and EXT both recognise DALI input from Light Sensors and Occupancy Sensors that utilise Tridonic eDALI commands. When triggering from an Occupancy Sensor select which state is to be matched. When using a Light Sensor, specify what range of light level (0-254) is to be matched. See the table below for light levels:
Light Sensor Level Lux Range 0 - 31 0.00 - 7.75 32 - 63 8.00 - 15.75 64 - 95 16.00 - 31.75 96 - 127 32.00 - 63.75 128 - 159 64.00 - 127.75 160 - 191 128.00 - 255.75 192 - 223 256.00 - 511.75 224 - 254 512.00 - 1008.00 NOTE: Light Sensor and Occupency sensor commands require the Tridonic custom DALI commands Project feature to be enabled
DALI Bus Power
RIO D, RIO D4 or TPC with EXT required.
Use this trigger if you want to act upon a change of the electrical state of a DALI bus associated with a specific DALI interface. Buses can be in one of three states: Correct Power, Incorrect Power and No Power.
NOTE: RIO D4 cannot detect incorrect bus power and selecting this option on an interface associated with a RIO D4 will present a project issue.
DALI Ballast Error
RIO D, RIO D4 or TPC with EXT required.
Use this to trigger from a DALI ballast reporting an error. Specify the interface then use All to match if any ballast on that interface reports an error. Alternatively select a single address to match to. Next select the error type to match to.
DALI Button Event
RIO D4 required.
Use this trigger if you want to act when a button event is received by a DALI interface.
Select the interface on which to listen for the event and the event source. The event source can be:
- Instance
- Device
- Device/Instance
- Device Group
- Instance Group
The trigger can act on Any event, or choose from:
- Button Pressed
- Button Released
- Short Press
- Double Press
- Long Press Start
- Long Press Stop
- Button Free
- Button Stuck
NOTE: Not all button stations send all events, and some stations may need configuration to send certain events. Consult the manufacturer's documentation for more information.
The trigger captures five variables:
- Short address
- Device group
- Instance number
- Instance group
- Event type
DALI Illuminance
RIO D4 required.
Use this trigger if you want to act when an illuminance report is received by a DALI interface.
Select the interface on which to listen for the event and the event source. The event source can be:
- Instance
- Device
- Device/Instance
- Device Group
- Instance Group
Select the minimum and maximum Level within which the trigger should act.
The trigger captures five variables:
- Short address
- Device group
- Instance number
- Instance group
- Illuminance value (0-1023)
DALI Occupancy
RIO D4 required.
Use this trigger if you want to act when an occupancy event is received by a DALI interface.
Select the interface on which to listen for the event and the event source. The event source can be:
- Instance
- Device
- Device/Instance
- Device Group
- Instance Group
Select the type of occupancy to look for: Any, Vacant or Occupied.
Select the type of movement to look for: Any, No Movement or Movement.
The trigger captures six variables:
- Short address
- Device group
- Instance number
- Instance group
- Occupancy type
- Movement type
Dynamic Triggers tend to receive a value which can be anywhere within a range (e.g. DMX 0-255). These inputs generally have the Changes in Range event and Enters range event, so that a trigger can be fired whenever the input changes or only when it crosses a threshold. This could be used to set the intensity of some fixtures whenever a DMX input changes, or start a timeline when a sensor connected as an analog input passes a threshold (e.g. wind speed)
DMX Input
LPC and LPC X rev 1 can receive DMX directly. TPC, LPC X rev 2 and LPC X S3 can only receive DMX-In via Art-Net and sACN.
Use the Controller setting to specify which controller should receive the DMX.
Now you should specify which DMX channel to look at and the range of values to trigger on. You can choose whether to trigger every time the value changes within the specified range ("Changes in range"), or to only trigger when the value enters the specified range ("Enters range"). "Enters range" is generally more useful when you are using DMX to trigger timelines, but "Changes in range" would be required if you were using a DMX channel as a variable passed to a Set Intensity action to control the intensity for a group.
DMX Input State
LPC and LPC X rev 1 can receive DMX directly. TPC, LPC X rev 2 and LPC X S3 can only receive DMX-In via Art-Net and sACN.
Use the Controller setting to specify which controller should receive the DMX.
The Event state defines when the trigger should be fired.
The Input Lost event will be fired when the controller detects that it is no longer receiving DMX on the configured input.
The Input Detected event will be fired when the controller detects that it is receiving DMX data after not receiving it previously.
Audio Input
The RIO A has a stereo balanced line level audio input that can be used as a trigger.
To trigger from a RIO A, select the number of the RIO A, or leave this set to Any to cause the trigger to attempt to match against audio input from any RIO A. In this case, the RIO number will be captured as a variable.
Use the Channel setting to specify whether the trigger should match against the left or right audio channel, or the combination of the two. Now select which frequency band to use, or leave this set to the overall volume of the channel. Each RIO A can analyse incoming audio as up to 30 frequency bands - see Remote Devices.
The Peak checkbox tells the trigger to match on the decaying level of the last peak in the audio frequency band.
Finally, specify the range of values to trigger on. You can choose whether to trigger every time the value changes within the specified range ("Changes in range"), or to only trigger when the value enters the specified range ("Enters range"). "Enters range" is generally more useful when you are using audio to trigger timelines, but "Changes in range" would be required if you were using an audio band as a variable passed to a Set Intensity action to control the intensity for a group.
Temperature
NOTE: This trigger will only fire on a TPC or a TPS. The TPS 5 or TPS 8 do not support this feature.
The TPC and TPS have a temperature sensor, which can be used in triggers.
Use the Touch Device option to specify which Touch Device should be considered the input source. To specify a particular TPC, enable the 'Trigger Controller Edit' project feature, set the trigger's controller to your TPC and set 'Touch Device' to 'Local'. Select the units as Celsius or Fahrenheit, then choose how to respond to changes. You can choose whether to trigger every time the temperature changes within a specified range ("Changes in range"), or to only trigger when the temperature enters a specified range ("Enters range"). "Enters range" is generally more useful when you are using temperature changes to trigger timelines, but "Changes in range" would be required if you were using the temperature reading as a variable passed to a Set Intensity action to control the intensity for a group.