Working with Scenes
Scenes are placed in the project Canvas and can control fixtures in any space they are placed in, as well as child spaces. Scenes can be added from the Add items to the project menu. Placing a Scene automatically opens the Scene in edit mode, where changes to the current Scene can be made in the Property Editor and tools windows. Static and Dynamic Scenes automatically start simulation when editing is begun.
Only one Scene can be active in each space. A default 'Off' Scene is part of each Space, which sets all fixture output to 0.
There are three Scene types in Expert; Static, Dynamic and Timeline:
Static – single static lighting looks of Colour and intensity.
Dynamic – a single dynamic preset which seamlessly plays back for as long as required.
Timeline – a collection of dynamic presets which loop on a timeline.
| NOTE: | Due to limitations in the DALI protocol, DALI fixtures will only be included in Static Scene programming and will be off in other Scene types. |
Adding Scenes
![]() Use the Add items to the project tool in the Canvas window to add a new Scene to the project. Scenes belong to a space and control the fixtures in that space and any child spaces. Double click the Scene icon to edit the Scene. As soon as you place a Scene in a space the edit mode starts.
Use the Add items to the project tool in the Canvas window to add a new Scene to the project. Scenes belong to a space and control the fixtures in that space and any child spaces. Double click the Scene icon to edit the Scene. As soon as you place a Scene in a space the edit mode starts.
An existing Scene can be duplicated by dragging the Scene while holding Ctrl (Option on macOS).
Scene Properties
Static Scene
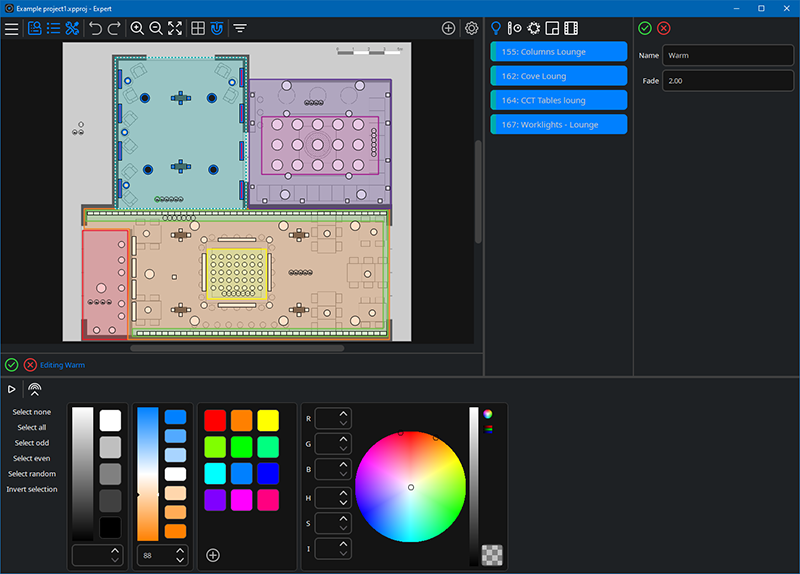
To edit a Static Scene select the icon![]() in the space. This will by default highlight all fixtures in the space (indicated by a blue fixture outline), including all child space fixtures as part of the Scene. Fixtures can be deselected. Any fixtures in the space but not in the Scene will be off when the Scene is played. The Scene will be in edit mode and will default to the settings shown until they are modified.
in the space. This will by default highlight all fixtures in the space (indicated by a blue fixture outline), including all child space fixtures as part of the Scene. Fixtures can be deselected. Any fixtures in the space but not in the Scene will be off when the Scene is played. The Scene will be in edit mode and will default to the settings shown until they are modified.
The properties editor includes the Scene Name, which will default to the next available number, e.g. Static 1, and this can be edited if required. The name is displayed when you hover the cursor over the Scene on the canvas. Also here is the Fade time for the effect to start, with a default time which can be changed in Preferences.
In the tools area, there are various quick selection options available for editing a static Scene with useful fixture selection choices, some commonly used intensity levels, a saturated Colour palette with customisable swatch and the Colour Picker to fine tune the colour and intensity. You can use the RGB wheel, HSI sliders or direct value on the entry fields.
To fine tune the Colour and intensity you can use the Colour Picker: the RGB wheel, HSI sliders or direct value on the entry fields.
Direct Control
The settings in the Tools window enable you to add some default settings to the fixtures, these are selection options, the percentage of how intense the Colour will be, and Colour options.
Extended Parameters
Parameters other than colour and intensity, like beam, position and gobo, can be controlled using extended parameter controls. To reveal extended parameter controls in the Scene editor, select at least one fixture containing extended parameters and click ![]() Show more. The Scene editor expands to reveal controls for fixture parameters in addition to colour and intensity. Controls for extended parameters are highlighted with a blue border to indicate a value has been set. To clear a value, hover the mouse over the control and click the
Show more. The Scene editor expands to reveal controls for fixture parameters in addition to colour and intensity. Controls for extended parameters are highlighted with a blue border to indicate a value has been set. To clear a value, hover the mouse over the control and click the ![]() knockout button.
knockout button.
Selection options:
-
None and All – select all or none of the fixtures.
-
Odd and Even – will select either the odd numbered fixtures or the even numbered fixtures in a space.
-
Random – will select half the number of fixtures in a space in a random order.
-
Invert – will select the fixtures that are not currently selected in a space.
Scene editing is automatically simulated on the canvas. To view the transition from off, restart the Scene with Simulate![]() . If the project has been uploaded to your Expert Control you can toggle Live Output
. If the project has been uploaded to your Expert Control you can toggle Live Output![]() to view the Scene on the fixtures. (Note this will turn off any current playback on fixtures not in this Scene).
to view the Scene on the fixtures. (Note this will turn off any current playback on fixtures not in this Scene).
When you have completed editing your Scene, click Commit or Cancel![]() .
.
Dynamic Scene
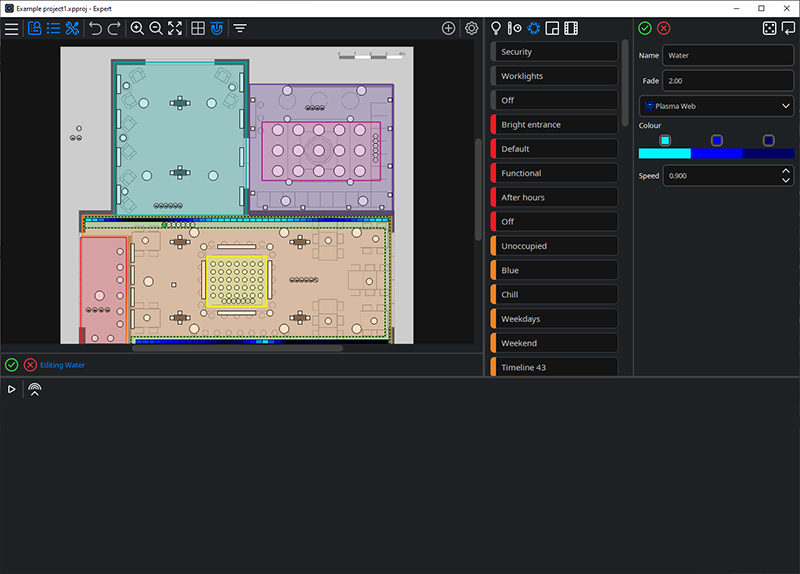
To edit a Dynamic Scene select the icon![]() in the space. The Scene will be in edit mode and will default to the settings shown until they are modified. The Scene is applied to all the fixtures in the space it has been placed in – including child space fixtures.
in the space. The Scene will be in edit mode and will default to the settings shown until they are modified. The Scene is applied to all the fixtures in the space it has been placed in – including child space fixtures.
The Scene Name will default to the next available number, e.g. Dynamic 1, this can be edited if required. The name is displayed when you hover the cursor over the Scene on the canvas. Also here is the Fade time for the effect start / transition time, with a default time which can be changed in Preferences.
Expert offers a rich, curated library of dynamic, vibrant, subtle, and artistic lighting presets to inspire your design. Each preset will have some limited parameters that can be adjusted.
To browse the available presets, click on the current preset to select from the library.
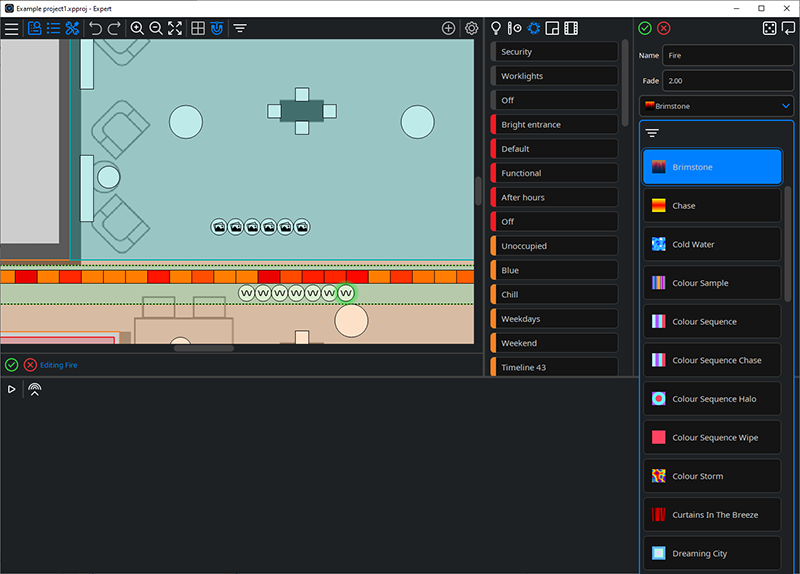
Use the filter![]() to narrow down the preset browser to the effect category you’re looking for.
to narrow down the preset browser to the effect category you’re looking for.

Depending on the preset selected you may be offered some adjustment settings such as, Colour, Loop time, Step time, Style, Strength, Speed, Fade fraction, Density, Rotation direction, and Direction. Each preset also includes the Randomise![]() function in the Property Editor toolbar. It is also possible to undo any changes you have made to the preset by selecting Reset
function in the Property Editor toolbar. It is also possible to undo any changes you have made to the preset by selecting Reset![]() in the Property Editor toolbar.
in the Property Editor toolbar.
Scene editing is automatically simulated on the canvas. To view the transition from off, restart the Scene with Simulate![]() . If the project has been uploaded to your Expert Control you can toggle Live Output
. If the project has been uploaded to your Expert Control you can toggle Live Output![]() to view the Scene on the fixtures. (Note this will turn off any current playback on fixtures not in this Scene).
to view the Scene on the fixtures. (Note this will turn off any current playback on fixtures not in this Scene).
When you have completed editing your Scene, click Commit or Cancel![]() .
.
Timeline Scene
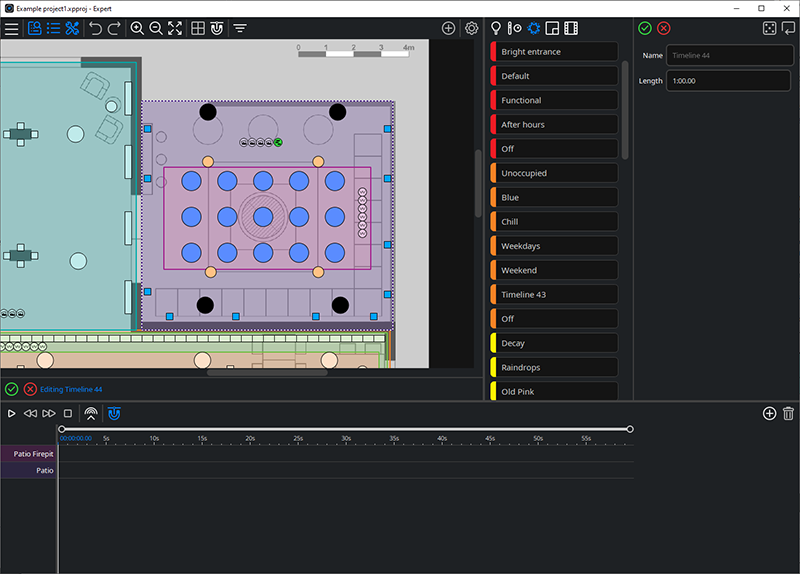
To edit a Timeline Scene select the icon![]() in the space. The Scene will be in edit mode and will default to the settings shown until they are modified. The Timeline is applied to the fixtures in the selected Space.
in the space. The Scene will be in edit mode and will default to the settings shown until they are modified. The Timeline is applied to the fixtures in the selected Space.
| NOTE: | Except DALI fixtures which can only be in Static Scenes. |
The Scene Name will default to the next available number, e.g. Timeline 1, this can be edited if required. The name is displayed when you hover the cursor over the Scene on the canvas.
Length sets the nominal duration of the timeline, which will automatically loop when it reaches the end.
| NOTE: | If the programmed contents of a timeline do not reach the set length, the loop will occur from the end of the final preset, or use the Crop to Content setting. |
The same curated library of dynamic, vibrant, subtle and artistic lighting presets available in Dynamic Scenes is available again in Timeline Scenes. Each preset has some limited parameters that can be adjusted. Depending on the preset, you may be offered some adjustment settings such as Colour, Loop time, Style, Strength, Speed, Fade fraction, Density, Rotation direction, and Direction. Each preset also includes the Randomise![]() function in the Property Editor toolbar. It is also possible to undo any changes you have made to the preset by selecting Reset
function in the Property Editor toolbar. It is also possible to undo any changes you have made to the preset by selecting Reset![]() in the Property Editor toolbar.
in the Property Editor toolbar.
The timeline is displayed in the Tools window. There is a row for the space the timeline Scene belongs to and additional rows above it for any child spaces.
-
Priority and "Last Action" – If two presets start at the same time on a child space row and a parent space row, the highest row wins, so the child space will play its own effect. Any new preset starting on the timeline on any child or parent space row will take over playback in those spaces based on the LTP (Latest Takes Precedence) or “Last Action” philosophy.
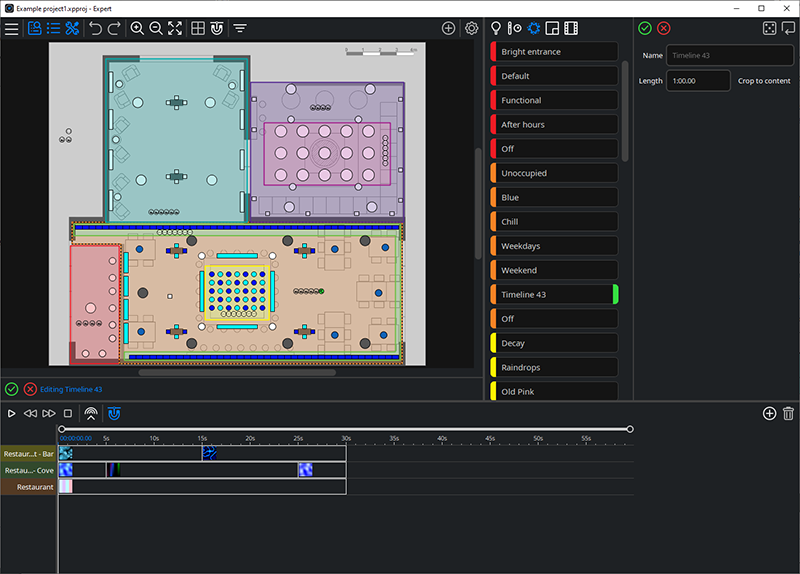
Build your timeline by clicking Add preset![]() . Select a preset from the dropdown directory, adjust any Colour or other setting parameters offered to your preference then drop the preset onto the desired Space row on the timeline. Use the preset’s endpoint handles to adjust the preset to the required length and start / finish point. This can be adjusted more precisely by modifying the Start and End time fields. Incoming fade times and release times (if fading to off) are also set in the timing fields to the right of the timeline. The default Fade time can be set in Preferences.
. Select a preset from the dropdown directory, adjust any Colour or other setting parameters offered to your preference then drop the preset onto the desired Space row on the timeline. Use the preset’s endpoint handles to adjust the preset to the required length and start / finish point. This can be adjusted more precisely by modifying the Start and End time fields. Incoming fade times and release times (if fading to off) are also set in the timing fields to the right of the timeline. The default Fade time can be set in Preferences.
Timeline Tools
![]() Add preset – add a lighting preset to your timeline.
Add preset – add a lighting preset to your timeline.
![]() Delete.
Delete.
![]() Snap to presets – if toggled on, once some presets have been placed on the timeline, painting new presets will snap to the same timepoint if near the beginning or the end of another preset. This is true of painting presets to the same or different Space rows on the timeline.
Snap to presets – if toggled on, once some presets have been placed on the timeline, painting new presets will snap to the same timepoint if near the beginning or the end of another preset. This is true of painting presets to the same or different Space rows on the timeline.
 Adjusting the endpoints of this line enables scrolling and zooming in of the timeline.
Simulate the timeline on the Canvas with these tools![]() Start simulation or Pause simulation, Jump back 10 seconds, Jump forward 10 seconds and Stop simulation
Start simulation or Pause simulation, Jump back 10 seconds, Jump forward 10 seconds and Stop simulation ![]() . If the project has been uploaded to your Expert Control you can toggle Live Output
. If the project has been uploaded to your Expert Control you can toggle Live Output![]() to view the timeline on the fixtures.
to view the timeline on the fixtures.
| NOTE: | This will turn off any current playback on fixtures not in this Scene. |
When you have completed editing your Scene, click Commit or Cancel![]() .
.
Media
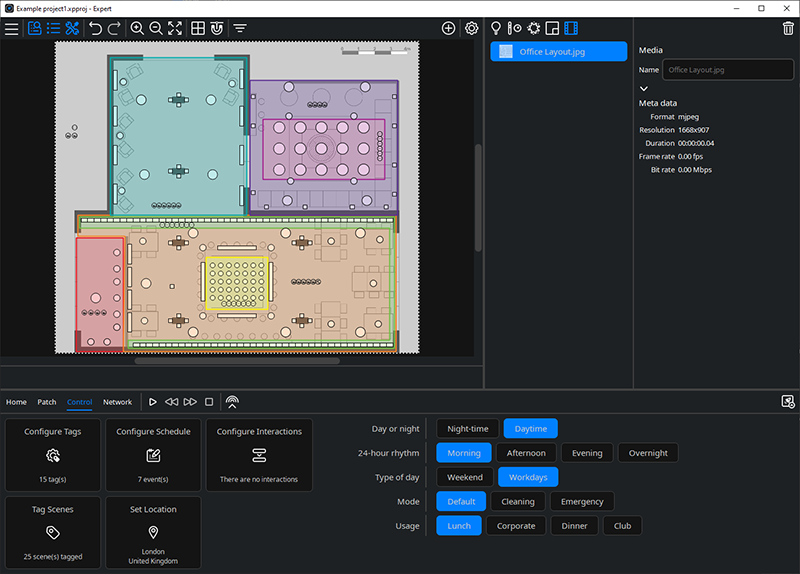
Media can be used in Expert in either Dynamic or Timeline Scene types. Media can be added from the Add items to project![]() tool in the Canvas window. Select the file you want to use in Expert, and it will be added to the Media
tool in the Canvas window. Select the file you want to use in Expert, and it will be added to the Media![]() tab of the Browser.
tab of the Browser.
To use media in a Scene, simply Add![]() or Edit
or Edit![]() a Scene and choose the media from the preset selection drop down in Dynamic or Timeline Scenes. Selecting media in the Browser allows you to rename or Delete
a Scene and choose the media from the preset selection drop down in Dynamic or Timeline Scenes. Selecting media in the Browser allows you to rename or Delete![]() the media.
the media.
| NOTE: | Media is imported at full resolution and will be stored as such in the Expert project file. If a media file is deleted from the project file, it will be lost and not recoverable without the source media file. |
Media files supported are as follows: .asf, .avi, .divx, .dv, .f4v, .flv, .m2v, .m4v, .mov, .mp2, .mp4, .mpe, .mpeg2, .mpeg4, .mpg, .wmv, .jpg, or .jpeg.