Working with Schedule
In Expert there is a streamlined, modern approach to scheduling. The familiar calendar view allows for events to be viewed logically, and events themselves support full recurrence options with exceptions.
Manual events and events created by tags can be viewed here.
![]() You can find Scheduling by navigating to the Tools window and selecting the Control tab and selecting Configure Schedule.
You can find Scheduling by navigating to the Tools window and selecting the Control tab and selecting Configure Schedule.
Schedule Properties
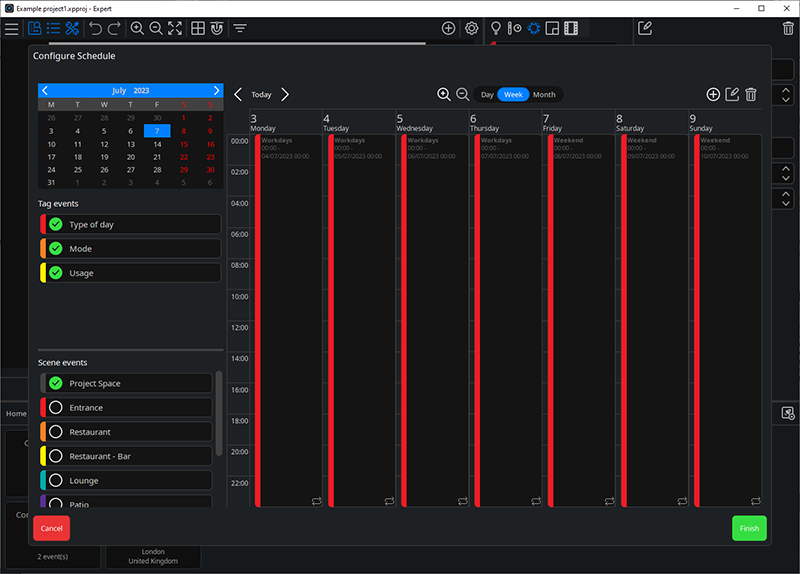
Choose which event types and events to view on the calendar from the lists on the left.
The Calendar can be navigated using the arrows to navigate forward or back between the current view selection. Specific dates can be selected in the month navigation view. View options for Day, Week or Month are available.
Tag events – tags which have time related changes can be shown on the calendar view for simplicity of managing what a project is doing. Some tags occurrences can be directly edited in the Schedule.
Scene events – all Scenes in the project, including the Off Scene, can be scheduled directly here. Scheduled Scene changes will be grouped by Spaces.
Creating an event
To Add a new event, click on the![]() button in the top right or click and drag on the schedule view where the event is to be scheduled.
button in the top right or click and drag on the schedule view where the event is to be scheduled.
The first option presented here is to select if the event is to start a Scene, including running the Off Scene, or change an active tag. For a Scene, select Scene in the left-most column, then the Space the Scene is part of and finally the Scene to schedule, including the Off Scene if required. The process is similar for a tag change, select Tag on the left-most column, followed by Tag Set and then the Tag to be made active. Once a valid selection has been made, click Next to choose when the event is to be scheduled.
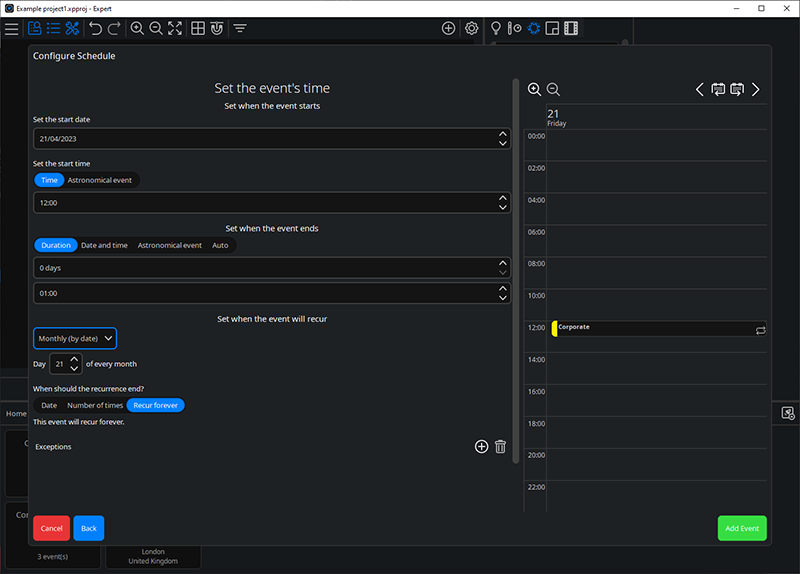
Set the event’s time - this window allows you to adjust the start and end times of the event. You can also add Exceptions where you can add a date range of when you do not require the event to take place, for example, during an opening times event you may wish to close for a day such as a public holiday or special event.
Set when the event starts
Set the start date
-
Date - specify the date on which the event should start.
Set the start time
-
Time – choose a real time value for the start point of the event.
-
Astronomical event – choose a start point for the event based on the position of the sun with an optional offset.
| NOTE: | The location must be set in a project for accurate astronomical events. |
Set when the event ends
-
Duration – set a fixed duration for the event for the event to be active from the start time, specified in days and hours.
-
Date and time – set a fixed point in time for the event to end.
-
Astronomical event – choose an end point for the event based on the position of the sun with an optional offset.
| NOTE: | The location must be set in a project for accurate astronomical events. |
-
Auto (project dependant) – this option will schedule the event to be automatically active until the next scheduled Scene change or tag change.
Set when the event will recur
Recurrence settings
-
Once – the event will happen once.
-
Daily - the event repeats every x number of days, specified as a number.
-
Weekly – the event repeats on each specified day of the week.
-
Monthly (by day) – the event repeats on each specified day of the month, selected by week of the month and week day.
-
Monthly (by date) – the event repeats on each occurrence of the date specified in a month.
-
Yearly – the event repeats each year on the date specified as the start date.
| NOTE: | The event will also be active during the start date specified, regardless of recurrence specified. |
When should the recurrence end?
-
Date – the event with repeat in line with its recurrence settings until the specified date and time.
-
Number of times – the event will repeat the specified amount of times, with a minimum of one additional time from the start date and time.
-
Recur forever – the event will repeat indefinitely.
Exceptions
Add date ranges in which the event will not recur, regardless of the recurrence settings for an event.
| NOTE: | Event recurrences are not displayed in the calendar preview when adding an event. They are displayed in the full schedule once added. |
Click on Add Event or Cancel to finish.
Editing an event
Select an event on the schedule to begin the editing process. Double clicking an event opens the editing options immediately.
If the event is an event recurrence, then double clicking will open the editing interface for the original event. Select the event on the calendar and choose the edit tool in the top right to optionally edit the event series or that single occurrence.
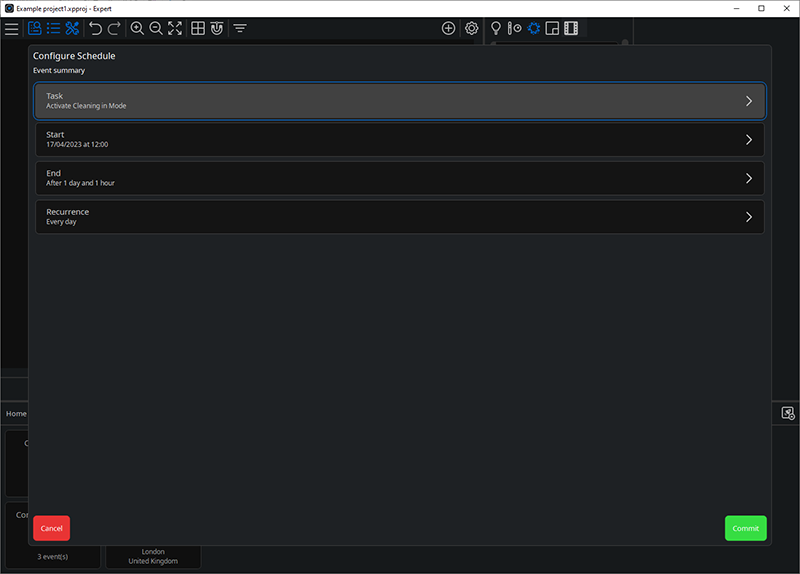
When editing an event, the editing interface first shows which aspects of an event can be edited.
Deleting events is similar to the editing process. If an event with recurrence option is deleted, the recurring events are also deleted. Recurrences can be individual deleted from the schedule.
| NOTE: | Event recurrences are not deleted from the original event, instead an exception is created to remove the deleted event. |
Suppress Schedule
It’s possible to suppress Expert’s schedule from any touch device showing the schedule or Tags pages, using the suppress schedule output in interactions, via the schedule tab in the web interface, or via Pharos Cloud. While suppressed, Expert Control will not run any scheduled events or tag changes.
While Expert’s schedule is suppressed no schedule or tag changes will activate on the controller. This affects the whole system, and not just lighting output.
Suppressing the schedule will not immediately affect lighting output. When schedule suppression is disabled, Expert Control’s state will be updated to reflect what would have been output at that time if the schedule had never been suppressed.
| NOTE: | Suppress schedule does not persist over a loss of power or project file upload and will default to schedule on. |