Working with Interactions
As well as lighting output States being determined by Tags, Schedule and human interaction with touch devices, there are Interactions which can be used to affect the lighting state.
The Digital Inputs and the Push Button on Expert Control can be mapped to one of several outcomes including changing a Tag, activating a Scene, or modifying intensity in a Space. A currently active Tag, or an Intensity master for a Space, can be mapped to interact with an outcome such as activating a relay out on Expert Control or modifying intensity in a Space.
These interactions allow programming of switches, sensors, key switch overrides and similar devices. States determined by schedule or tags as part of automated playback can affect another element of playback. Some interactions are straightforward, some will require additional settings such as threshold or step values, or selecting specific spaces, Scenes or tags.
Interaction Inputs, Outputs and their Properties
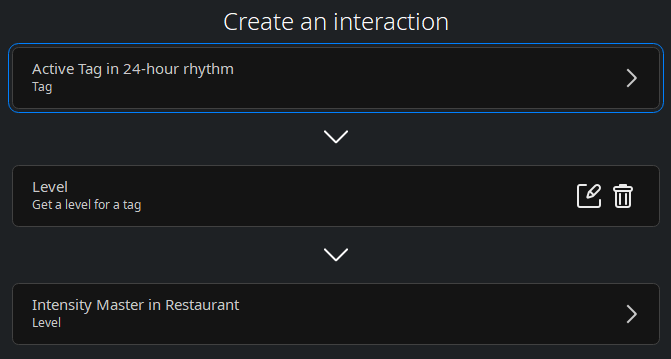
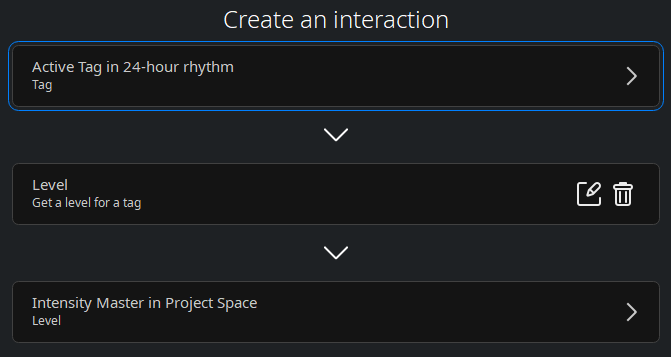
Interactions can be managed selecting Configure Interactions from the Control tab. From here, new Interactions can be added![]() , edited
, edited![]() and deleted from the project
and deleted from the project![]() .
.
When adding a new Interaction, first select the desired input and output. Next, set configuration options as required. Inputs are the starting point of an Interaction and typically activate an Interaction when there is a change to the hardware or playback. Outputs dictate what the system will do after the Input is received.
Once an Input and Output have been selected properties for an Interaction may become available if required. The properties available in an Interaction depend on the Input and Output selected and can be flexible. Some terms in these properties are quite detailed:
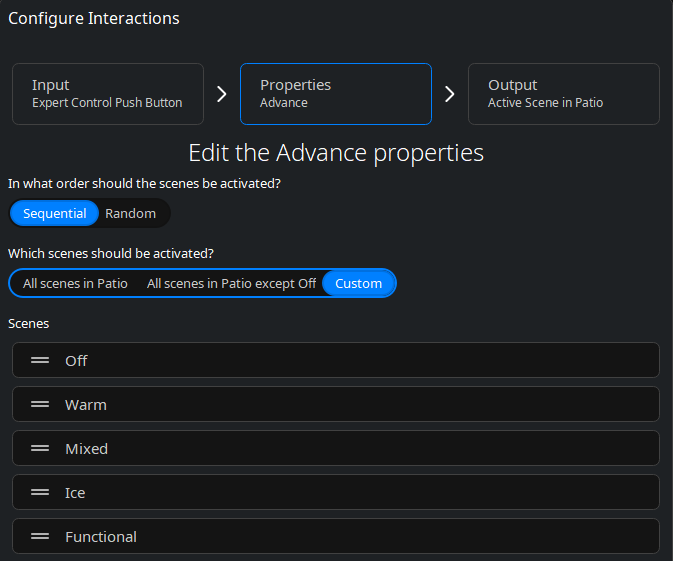
Advance - increment through the selected output option. For example, once you have selected a space containing Scenes, you can choose to step between those Scenes in order or randomly, and between all Scenes, all except off and a custom option where you can remove certain Scenes from the Advance list, and reorder Scenes for sequential play.
Flip – flip a on/off output when the input changes, configurable to flip the output when the input changes to On, to Off, or Any.
Level – specify a percentage value for each input and apply this value to the output.
Mapping – defines which DALI Scene numbers correspond to which ExpertScene numbers.
Matches – specify a value against which the input condition is tested for a match.
Number – for DALI commands; group and Scene numbers may be required (Note: DALI numbering is 0-15).
Raise / Lower – change the output value by a specified step value, where negative values lower the output value.
Threshold – when a certain value of an input passes a given level, an output option is triggered.
Toggle - move between two output options when one of two input options is matched.
Available Interaction Inputs and Interaction Outputs will depend in part on what you have added to your project, and how you have configured ports (eg Input ports on Expert Control can be configured as analog, digital or contact closure).
| Interaction Inputs include: | Interaction Outputs include: |
|---|---|
| Active Scene | Active Scene |
| Active Tag | Active Tag |
| Analog Input | DALI Direct Level |
| DALI Direct Level | DALI Scene |
| DALI Level Down | Digital Output |
| DALI Level Off | Intensity Master |
| DALI Level Up | Suppress Schedule |
| DALI Scene | |
| Digital Input | |
| Intensity Master | |
| Push Button | |
| Suppress Schedule |
| NOTE: | If the selection is invalid for mapping, you will be presented with a message. |
Here are some examples:
Digital inputs and Relay outputs
These connection ports on Expert Control are a very useful example of Interactions so let’s look at a couple of scenarios first.
| PLEASE NOTE: | Inputs can be configured as Contact Closure (volt-free switch where circuit is simply open or closed), Digital Input (external low volt source where the threshold for high and low can be set), or Analog (external variable low volt source where a continuously changing value can be mapped to meaningful outcomes). Inputs can be configured by selecting a controller in the Network tab of the Tools menu and clicking Configure Inputs in the Property Editor. |
Digital Input to Active Scene
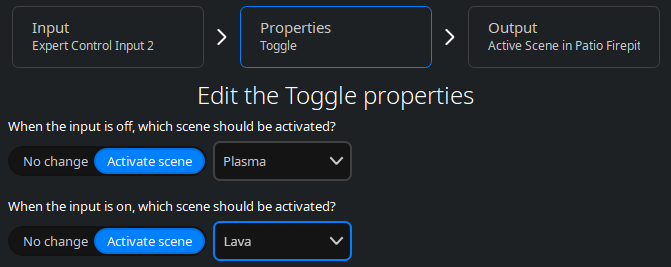
Here we have a controller’s digital input and are using it to switch between two Scenes in a space. This could be triggered by a host of devices such as a simple light switch, an occupancy sensor, or similar, that will effectively send an on / off to the circuit. So, when the contact closure or digital input is in its off mode (when the circuit is open for contact closure / low for digital input) the Plasma Scene will play, but when it is activated on (closed for contact closure / high for digital input) the Lava Scene will play.
Intensity to Relay Output
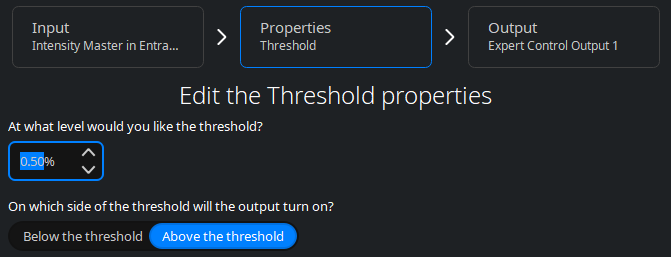
In this instance we are mapping the intensity level of a space to turn on a relay output port on the controller. When intensity is adjusted above 50% - perhaps from a slider on a touch device – the relay output will turn on. If intensity then goes back down below 50%, the relay will turn off. This low-volt relay could be used, for example, to interact with another system or energise an external high-volt relay to power a mains device.
Tags and Scenes
It is anticipated that typically, you will simply tag your Scenes to activate them directly, but there may be some instances where you need an interaction set up to achieve your desired state. This is perhaps more likely when a Scene is activated via a touch device in one space (rather than via schedule and tag changes in playback) in which case you might want to follow that user Scene selection with additional programming. Equally, a tag state, for instance, may be required to interact with another external device or system.
Tag to Relay Output

Here we are using the Night-time tag that Expert Control calculates based on local sunset. This interaction will then activate a relay output on the controller when the Night-time tag is active and turn the relay off when the Daytime tag takes over.
Analog Input to Intensity Master
This example demonstrates how Expert can change the intensity master value for a project space according to analog input changes.
| NOTE: | The inputs on Expert Control can be configured as analog, digital or contact closure from the Property Editor when Expert Control is selected in the Network tab of the Tools Menu. |
With this interaction set up, an external analog input such as a potentiometer dial or slider will directly adjust the intensity of the fixtures in the specified project space.
What we want to achieve here is an overall reduction in light output at midnight on an exterior installation to reduce light pollution. Perhaps you have many spaces playing their own Scenes (and different Scenes dependant on days, seasons, etc.) so it is not practical to programme new, lower-level Scenes to play at midnight for every circumstance. When the Midnight tag becomes active, intensity will fade down over a selected time to the selected level. When the next tag becomes active (eg Morning at sunrise) the intensity can be programmed to restore to 100% over the same time period.
Push Button to Scene
In this example, we are using the Push Button on the front of the Expert Control to scroll through a list of Scenes in a space. This allows the user who has access to the controller to override the programmed playback to select a particular lighting look.
It is also possible to set the push button to toggle between two Scenes.
DALI
DALI Interaction options can be used to integrate with other DALI hardware which can output Scene recall or Set Intensity commands. Interactions can also be used to send Scene recall commands. During setup various aspects of DALI specific controls will need to be established, this will include DALI group numbers.
| NOTE: | If Expert Control is also being used to control DALI fixtures there is a chance that DALI commands will clash, and fixtures may not respond as they are expected too. |
DALI Scene recall to Expert Scene
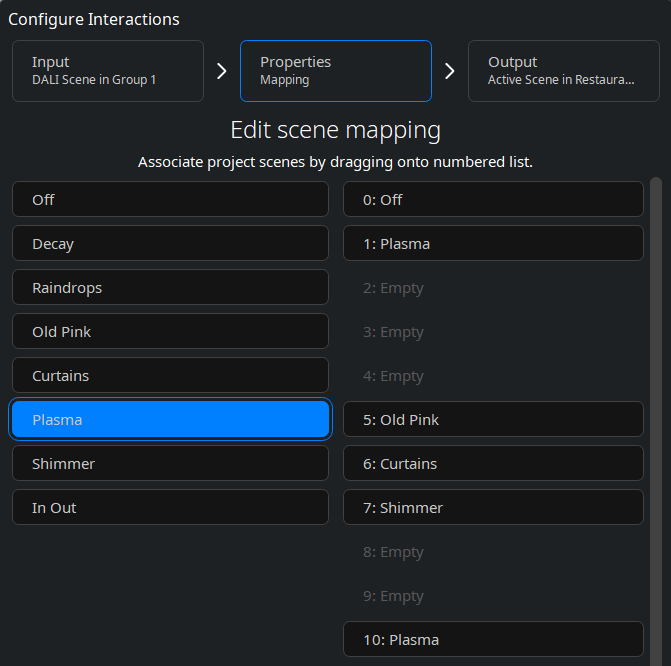
The example shows how a DALI Scene recall command on a given DALI group can activate a given Scene in a selected space. Scenes in a space can be mapped to a DALI Scene number in any order and can include multiple instances of each Scene and gaps between DALI Scene numbers. This example is a typical set up where a DALI wall station controller sends simple Scene recall commands on the DALI bus.
DALI Level to Expert Intensity Master
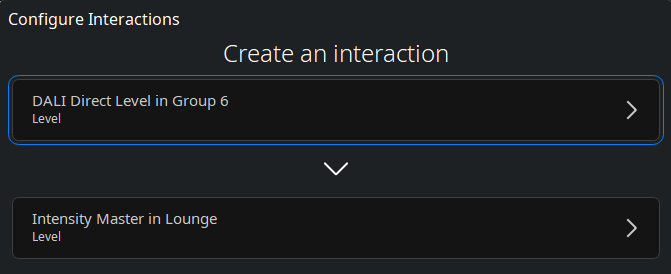
This straightforward Interaction shows linking a DALI direct level input to an Expert space intensity master. This means the intensity value will track to whatever the DALI input is sending to the controller.