Working with Spaces
Spaces are used to manage your project and let you group your fixtures intuitively, from the default, single project canvas to nested rooms and zoned areas, allowing your fixtures to be naturally grouped where they are located. Nested, or child, spaces inherit programming and overrides from a parent space by default and will need to be created after the parent space is created.
| NOTE: | Spaces can be added after fixtures have been added to a project, the fixtures will inherit the settings from any parent or child Space they are added to. |
To create or edit your Space you select from the following options:
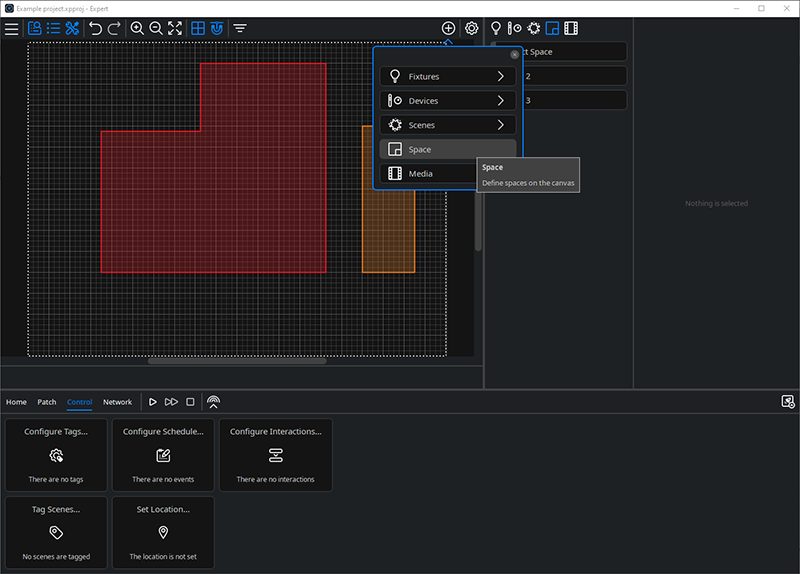
![]() Use the Add items to the project tool in the Canvas window to add a new Space to the project. To add a square or rectangular space click and drag the shape for the desired shape. For a polygon, click individual nodes on the canvas for the desired shape, additional nodes can be added, and a space is finished when closed back at the starting node. Once you have added the spaces you require Press Escape to finish or select Finish
Use the Add items to the project tool in the Canvas window to add a new Space to the project. To add a square or rectangular space click and drag the shape for the desired shape. For a polygon, click individual nodes on the canvas for the desired shape, additional nodes can be added, and a space is finished when closed back at the starting node. Once you have added the spaces you require Press Escape to finish or select Finish ![]() . Spaces hierarchy is automatically managed, parent or child, by how spaces are drawn within each other.
. Spaces hierarchy is automatically managed, parent or child, by how spaces are drawn within each other.
Each Space is given a default Colour, to make identifying the different spaces easier, and you can also select a Space Colour of your choice in the Space Properties.
Space Properties
![]() Edit Mode (toggle the tool for active/inactive) – Enable edits to the geometry of spaces. Select the Space you would like to edit and then select the Edit tool from the Property Editor window. You can modify the shapes by selecting the corner nodes or the mid nodes, and clicking on any point of the dotted line will add additional nodes to the shape of the Space.
Edit Mode (toggle the tool for active/inactive) – Enable edits to the geometry of spaces. Select the Space you would like to edit and then select the Edit tool from the Property Editor window. You can modify the shapes by selecting the corner nodes or the mid nodes, and clicking on any point of the dotted line will add additional nodes to the shape of the Space.
There is also a right click context menu to Enable space edits.

![]() Edit fixture order - Fixtures placed in a Space have an order which may be applied for some Scene effects. This order can be adjusted in a space. To do this, click on the
Edit fixture order - Fixtures placed in a Space have an order which may be applied for some Scene effects. This order can be adjusted in a space. To do this, click on the![]() in the Properties toolbar of a space to view and edit the order of fixtures.
in the Properties toolbar of a space to view and edit the order of fixtures.
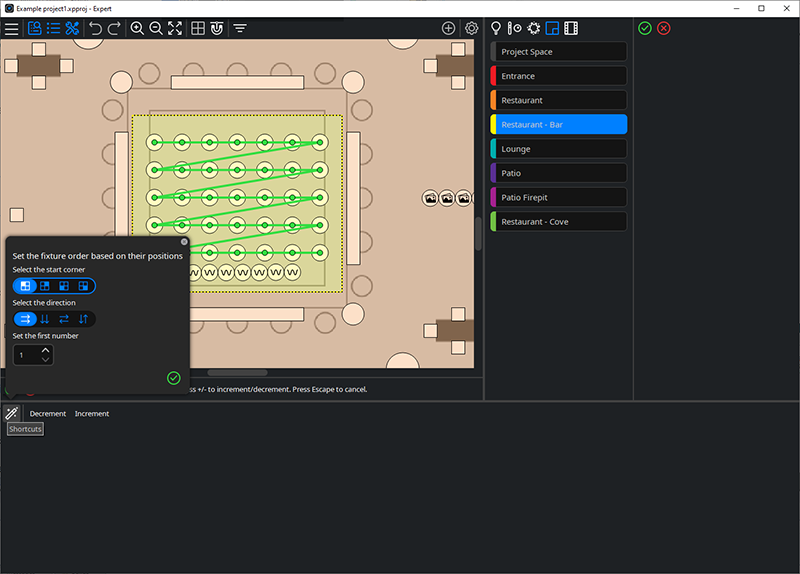
Individual fixture order can be explicitly set in the property editor, or the tools panel provides options for automatic ordering based on fixture layout and individual bump controls for a selected fixture.
![]() Edit pixel grid – Editing the pixel grid for a selected Space. A default pixel grid is generated for fixtures in a space that is used when effects are played back, to determine what part of the effect is played on each fixture. You can adjust the number of Rows, Columns and Angle of the grid to adjust the resolution of the matrix which will change how effects play across the fixtures. This is a Space setting which will be used for all Scenes played back. There is a Best fit
Edit pixel grid – Editing the pixel grid for a selected Space. A default pixel grid is generated for fixtures in a space that is used when effects are played back, to determine what part of the effect is played on each fixture. You can adjust the number of Rows, Columns and Angle of the grid to adjust the resolution of the matrix which will change how effects play across the fixtures. This is a Space setting which will be used for all Scenes played back. There is a Best fit![]() button to restore the default.
button to restore the default.
![]() Delete the selected Space.
Delete the selected Space.
| NOTE: | This will also delete any child spaces, and all fixtures, Scenes and devices in those spaces. |
Name – of your space, this can be the default name e.g. Space 2 or you can customise the name to suit your project.
Number – of your Space which can be modified to suit your project.
Colour – allocate a Colour for your space instead of the default Colour, to make it easier to identify on the Canvas.
In the Properties dropdown you can edit:
Placement – shows the X and Y co-ordinates of the top-left corner of a Space on the canvas.
Dependency – there are three space behaviour options; Dependant, Independent and Independent Except Off.
-
Dependant – inherits the settings from the parent space for the fixture programming.
-
Independent – fixture programming in the child space will be independent of any parent space it is located in.
-
Independent Except Off – as above, in addition the fixtures will turn off if the Off Scene of the parent space is activated. For more information see Off State.