Working with Tags
Tags are a flexible way to program your lighting changes. Tags are designed to shift between different active tags automatically, or, depending on a tag's settings, manually. When combined with Scene Tagging this means that complex logic for lighting control is handled in an easy-to-understand way. Combined with full simulation and optional additional scheduling and interactions, the Pharos tag engine is extremely powerful.
Various types of tag sets for behaviours such as time of day, position of the sun, and opening times allow many ways to activate your lighting Scenes.
Each tag set must have one tag active at any given moment. In custom tag sets or tag sets not based on time or date, the default tag will be active on start up.
Configuring Tags
![]() Configure Tags – from the Configure Tags Helper in the Control Tools, a window will open with a current list of tag sets in your project, if none are listed you will see You have no tags. To add or configure tags, there are the following options:
Configure Tags – from the Configure Tags Helper in the Control Tools, a window will open with a current list of tag sets in your project, if none are listed you will see You have no tags. To add or configure tags, there are the following options:
Add tags – select a behaviour for the tag set, here you can select more than one tag for your Scene.
Day or night – activated by the position of the sun. This tag can be given a Name and allocated a Colour. Under the Tags tab you can specify when the Daytime starts at time and the Night-time starts at time. The daytime start time has a pull down menu that has several options; the default Sunrise, Fixed time, Nautical dawn, and Civil dawn. The night-time start time has a pull down menu that has several options; the default Sunset, Fixed time, Civil dusk, and Nautical dusk. If selected, you can also set an Offset time. Under the Properties tab there are some further options to enable/disable the tag set, allow override of the tag set, and to set the fade time. Click on Commit or Cancel to finish.
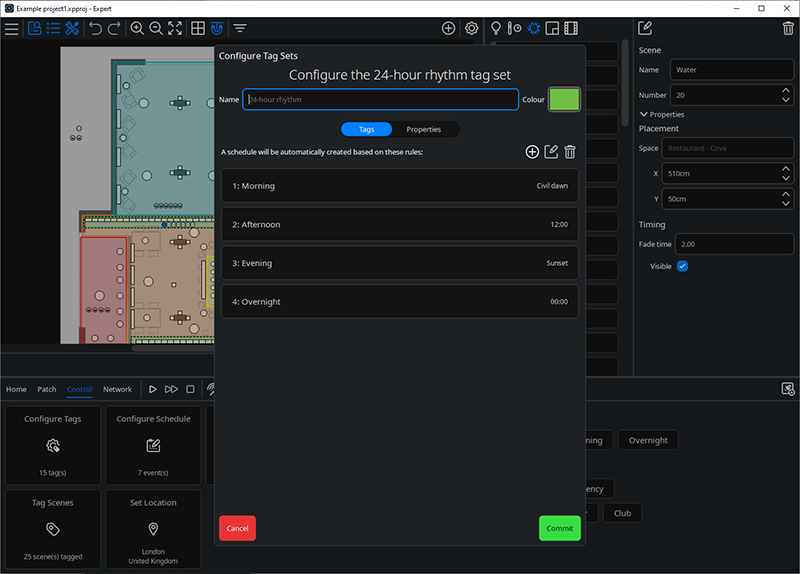
24-hour rhythm – activated at fixed or astronomical times. This tag can be given a Name and allocated a Colour. Under the Tags tab there are four default rules, these can be Edited or Deleted, you can also Add a new rule. Under the Properties tab there are some further options to enable/disable the tag set, allow override of the tag set, and to set the fade time. Click on Commit or Cancel to finish.
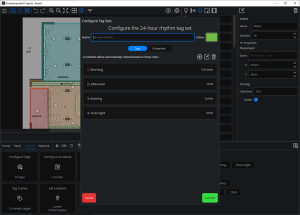
Edit - when modifying a rule it can be given an alternative Name, Number and Start time. The start time has a pull down menu that has several options; Fixed time, Nautical dawn, Civil dawn, Sunrise, Sunset, Civil dusk and Nautical dusk. If selected, you can also set an Offset time. Click on Commit or Cancel to finish.
Delete.
- Type of day – activated on different days of the week. This tag can be given a Name and allocated a Colour. Under the Tags tab there are options to specify your day types and when they occur. There are two default day types, these can be Configured or Deleted, you can also Add a new day type. Under the Properties tab there are some further options to enable/disable the tag set, set a time of day to activate the tag, and to set the fade time. Click on Commit or Cancel to finish.
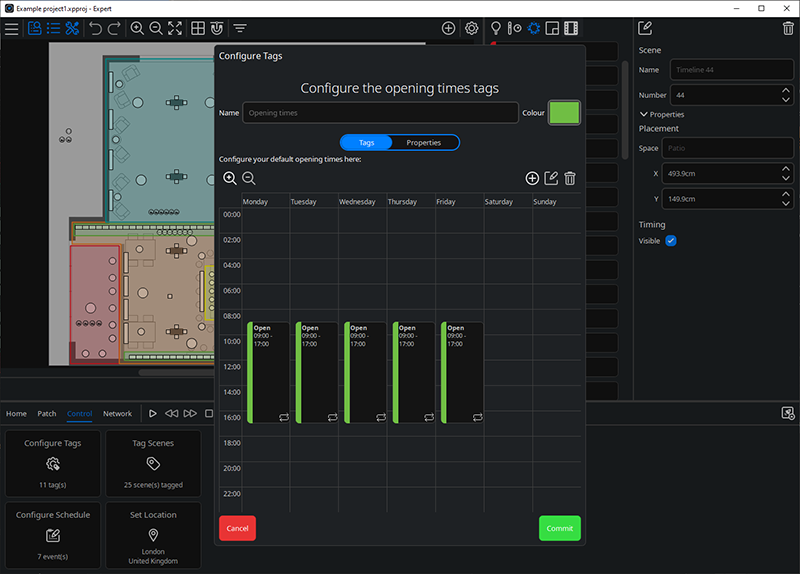
Opening times – activated during specific periods of the day. This tag can be given a Name and allocated a Colour. Under the Tags tab there is a calendar showing the default opening times, these can be modified by Add, Edit or Delete, you can also Zoom In or Zoom Out. Under the Properties tab there are some further options to enable/disable the tag set, allow override of the tag set, reset levels, and to set the fade time. Click on Commit or Cancel to finish.
Zoom In or Zoom Out – zoom in or out to view the opening times on each day.
Season – activated in different periods of the year. This tag can be given a Name and allocated a Colour. Under the Tags tab there are four default rules, these can be Configured or Deleted, you can also Add a new rule. Under the Properties tab there are some further options to enable/disable the tag set, allow override of the tag set, set a time of day to activate the tag, and to set the fade time. Click on Commit or Cancel to finish.
Rotary dial – activated by turning the dial on Expert Control. This tag can be given a Name and allocated a Colour. Under the Properties tab there are some further options to enable/disable the tag set, and to set the fade time. Click on Commit or Cancel to finish.
Emergency – activated in an emergency situation. This tag can be given a Name and allocated a Colour. There are some further options. Click on Commit or Cancel to finish.
Custom – activated by the user. This tag can be given a Name and allocated a Colour. Under the Tags tab there is one default tag plus one other, these can be Configured or Deleted, you can also Add a new tag. Under the Properties tab there are some further options to enable/disable the tag set, allow override of the tag set, set a time of day to activate the tag, allow scheduling, reset levels, and to set the fade time. Click on Commit or Cancel to finish.
Tagging Scenes
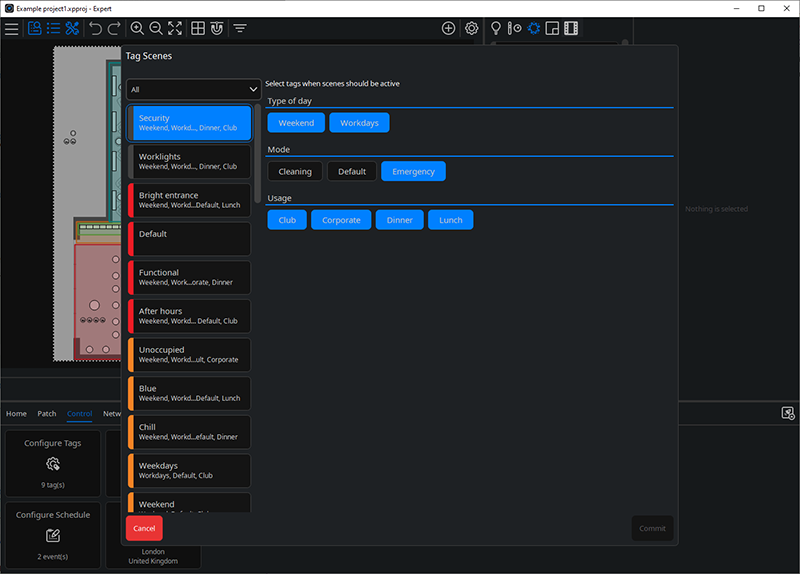
![]() Tag Scenes – from the Tag Scenes Helper in the Control Tools, a window will open with a list of Scenes in your project, if none are listed you will see No tags have been added to the project. The window will display all the Scenes in a list on the left and all the tags in a list on the right. Select a Scene then select tags you would like to associate with the Scene. Tags can be used in more than one Scene. Click on Commit or Cancel to finish.
Tag Scenes – from the Tag Scenes Helper in the Control Tools, a window will open with a list of Scenes in your project, if none are listed you will see No tags have been added to the project. The window will display all the Scenes in a list on the left and all the tags in a list on the right. Select a Scene then select tags you would like to associate with the Scene. Tags can be used in more than one Scene. Click on Commit or Cancel to finish.
Scenes will be made active when each active tag matches.
In the case where there are multiple tag matches, the Scene with the most tag matches will become active. In the case where Scenes have exact tag matches the active Scene will be that with the lowest Scene number.
Off State
If there are tags active which do not match any Scene, such as a situation where all Scenes have an Open tag assigned, but the project is at the Closed state, the Off Scene will play. This means, unless affected by Scenes placed on parent spaces, the output for the given space will be off. When the Off state is activated, the Master Intensity and any overrides are also cleared.
The off state can also be scheduled (for details see Working with Schedule) directly or set via the Touch Interface (for details see Working with Touch Interfaces).