Expert Touch
Expert Touch is the best way to provide detailed user interfaces to users of the control system.
Adding Touch Devices
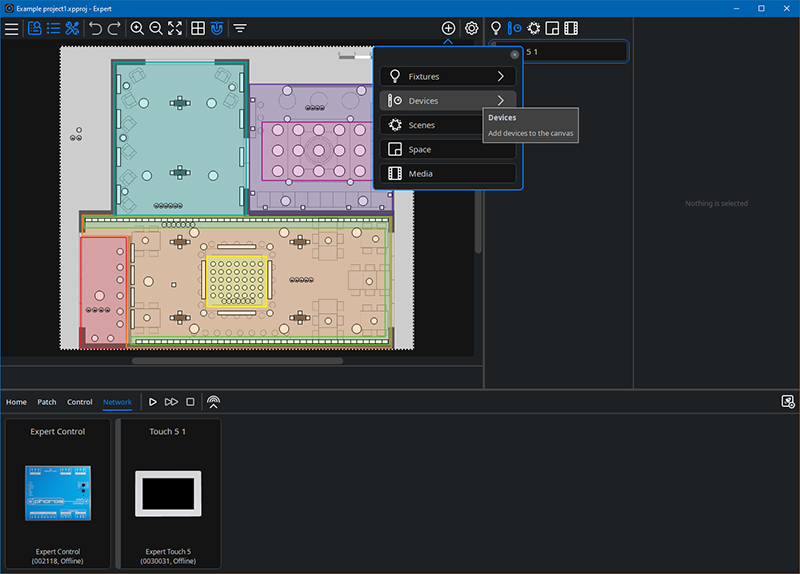
Touch devices are placed in the Canvas on their Space and can be added by clicking![]() Add, selecting Devices and choosing the touch device type you want to add. Click on the canvas to place a touch device. Once a touch device is placed on the canvas the touch interface helper will be opened. For more information, see Working with Touch Interfaces.
Add, selecting Devices and choosing the touch device type you want to add. Click on the canvas to place a touch device. Once a touch device is placed on the canvas the touch interface helper will be opened. For more information, see Working with Touch Interfaces.
An existing touch device can be duplicated by dragging the touch device on the canvas while holding Ctrl (Option on macOS).
Touch Device Properties
With a touch device selected on the canvas, the following options are available in the property editor:
![]() Preview interface – a window will open to show an interactive preview of the selected device’s screen with the configuration you have set for it. Previewing an interface will automatically start project simulation, allowing you to simulate lighting changes on the canvas when interacting with the touch device preview window. Some touch and project file changes will not be updated in touch device simulation immediately, closing and restarting simulation will ensure all changes are applied to the touch device simulation. By default, the interface will display to match the size and resolution of the device it is going to run on. You can choose simulation orientation in a device's properties.
Preview interface – a window will open to show an interactive preview of the selected device’s screen with the configuration you have set for it. Previewing an interface will automatically start project simulation, allowing you to simulate lighting changes on the canvas when interacting with the touch device preview window. Some touch and project file changes will not be updated in touch device simulation immediately, closing and restarting simulation will ensure all changes are applied to the touch device simulation. By default, the interface will display to match the size and resolution of the device it is going to run on. You can choose simulation orientation in a device's properties.
![]() Reload firmware – allows you to reload the firmware matching the software you are using to the selected hardware device.
Reload firmware – allows you to reload the firmware matching the software you are using to the selected hardware device.
![]() Configure device – here you can configure the network settings with either a fixed or DHCP IP address, and configure the display settings for Orientation, Normal Screen Brightness, Inactive Timeout, Inactive Screen Brightness, and Off Timeout.
Configure device – here you can configure the network settings with either a fixed or DHCP IP address, and configure the display settings for Orientation, Normal Screen Brightness, Inactive Timeout, Inactive Screen Brightness, and Off Timeout.
![]() Delete the selected device.
Delete the selected device.
Name – of your device, this can be the default name or you can customise the name to suit your project.
Number – of your device, which can be modified to suit your project.
In the Properties dropdown you can edit:
-
Placement
-
Space – This displays the space your touch device is associated with, and if it is located on the canvas within more than one space, the dropdown shows other spaces that could own it.
-
X & Y Displays – X and Y co-ordinates of the location of the touch device in its Space.
-
Simulation – if the associated hardware is available on the network, checking ‘Use physical orientation’ disables the rotate button when the interface is simulated. When unchecked, a default orientation can be specified and the rotate button will be enabled when the interface is simulated.
Interface override rules
When lighting changes (typically Scene, intensity or Colour overrides) have been initiated by a user on a touch device or from the web interface or Cloud portal control panels, those modifications will maintain until Expert Control has a scheduled or tag based change of state in programming, at which point the programmed lighting state will output.
Connecting and Pairing Touch Devices
Once a touch device has been added to an Expert project, it can be associated with a physical device. This allows the touch device and Expert Control to communicate once the project is uploaded to Expert Control.
To associate a physical touch device with your project, navigate to the Network tab of the Tools menu and select your touch device. Click Change device… in the Property Editor and select your touch device from the helper. Click Commit and upload your project to Expert Control by clicking the upload button![]() .
.
It’s also possible to pair a touch device with Expert Control after project upload using the pairing process.
If a touch device is active but has not been paired with a controller, the message Not paired with controller will be shown on the display. Tap Pair with controller to view a list of discovered controllers on the network.
If a touch device has previously been connected to a controller but cannot establish a connection, the message Waiting to receive interface from [serial number of previously paired controller] will continue to be shown on the display.
This can happen because:
-
Expert Touch does not have a network connection to the expected Expert Control.
-
The connected Expert Control is not running a project.
-
Expert Touch and Expert Control are running different firmware versions.
To select a different controller on the network, tap Change controller.
Touch Device Settings
Enabling the settings shortcut for a touch interface (see Working with Touch Interfaces) provides users with easy access to adjust the device’s pairing setting and other important configuration options.
Device settings are accessed by tapping the cog icon![]() .
.
Pairing
Paired – displays whether the touch device is paired with Expert Control.
Controller – the serial number of the connected Expert Control.
Project Name – the name of the project uploaded to Expert Control.
Device Name – the name of the touch device currently in use.
Pair with controller / Change controller – tap this button to pair the touch device with Expert Control.
Device Information
Firmware – the version of the firmware currently running on the touch device.
Network
DHCP – displays whether the touch device is using DHCP to obtain an IP address.
IP Address – the IP address currently being used by the touch device.
Subnet Mask - the subnet mask currently being used by the touch device.
Configure Network Settings – tap this button to toggle DHCP and assign a manual IP address, subnet mask and default gateway.
Device Information
MAC Address – the MAC Address of the touch device.
Serial Number – the Serial Number of the touch device.
Brightness – adjust the display brightness.
Screen Orientation – toggle between landscape and portrait orientation.