Example Project Walkthrough#
In order to provide an introduction to the use of the plugin, we have provided a sample Q-Sys designer file and complementary Pharos Designer project file at the links below:
These files were created in Q-Sys Designer v9.9.1 and Pharos Designer v2.12.2.
This testing was done using a Q-Sys vCore system, although the process would be similar with a physical processor.
Warning
This documentation is not intended to be a replacement for Q-Sys training; we would highly recommend anyone configuring a Q-Sys system be fully trained.
Project Details#
This file presents some basic controls for a Pharos Designer system on a Q-Sys User Control Interface (UCI). We will look at how the system is set up, and walk through the steps to create your own similar interface.
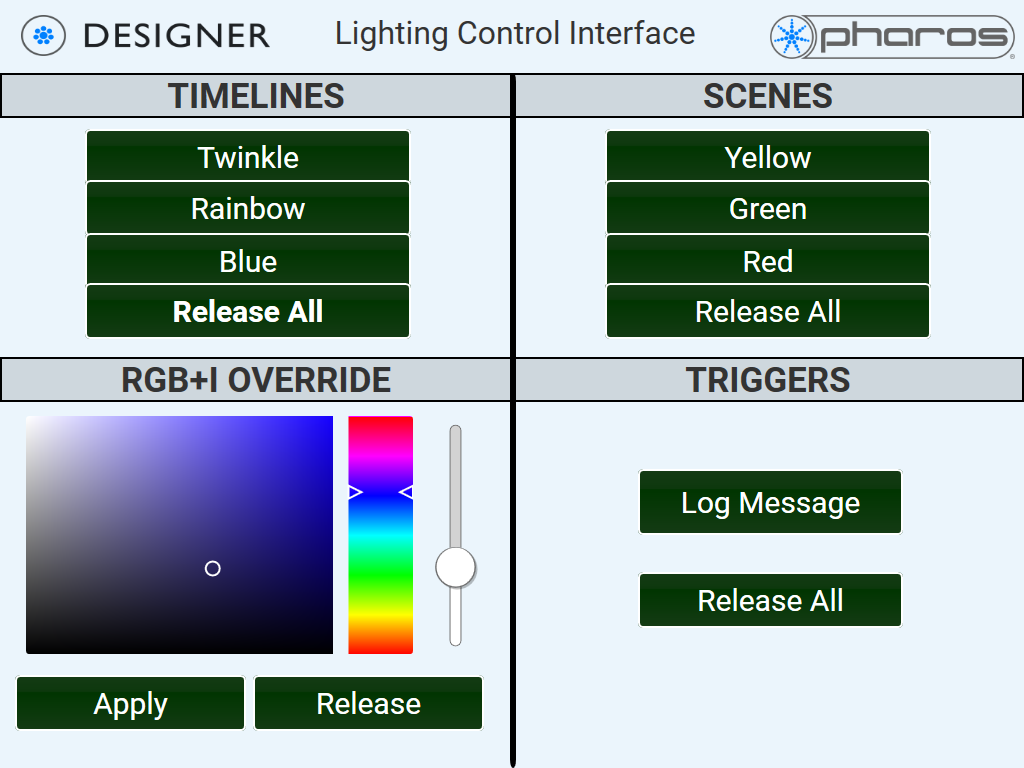
The final user interface will look like this:
Pharos Controller Setup#
The Pharos controller should be on the same network as the Q-Sys controller.
This sample projects expects it to be configured with a username of “admin” and a password of “password”, although we will see later how this is configured in Q-Sys.
Q-Sys Setup#
In order to work with a Q-Sys system, you need a copy of Q-Sys Designer (available for download from their website), and a Q-Sys controller (“Core”).
Without a Q-Sys controller you can create a configuration, but you will not be able to simulate or view certain things - for example, you will not be able to configure the IP settings of the Pharos Designer controller to communicate with, or simulate sending control commands.
There are three modes of operation available in Q-SYS Designer: Run, Design, and Emulate.
Run mode is a full operation mode occurring on the Core. All components of the design are operational and communication can be established with the Pharos controller.
Design mode is for designing your system. You can add and delete components, wire components one to another, arrange items in the Schematic or UCI, and so on.
Emulate mode allows you to enter a run-type mode without being connected to a Core.
Our plugin only supports connection to the Pharos system in Run mode, so in Design or Emulate modes you will not be able to establish connection to the Pharos controller.
With the Pharos plugin, you use Design mode to configure the number of objects (Scenes, Timelines, Overrides, Triggers, Universes) to be accessed, and you then use Run mode to configure the connection to the Pharos controller, retrieve information and control the objects.
Schematic Page#
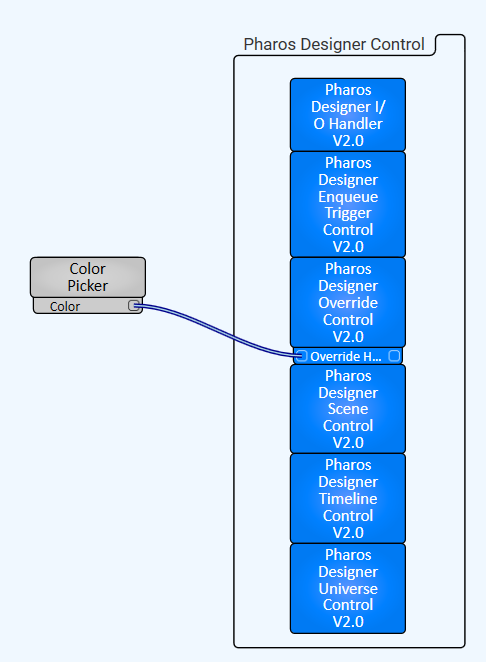
The schematic page is where the Pharos components are added. In a new project file you would drag them in from the Components pane.
A project requires at least one “I/O Handler” component. The IO handler establishes the connection from the Q-Sys controller to the Pharos controller.
In most Pharos projects you probably want one I/O handler connected to the Pharos network primary controller. Working via the network primary, the I/O handler will be able to control the system.
If your project has multiple Pharos systems which Q-Sys needs to interact with you might require more than one, but in most cases one will be sufficient. If you do use more than one, you need to differentiate them using the Plugin Group ID.
The rest of the plugins are optional, so for example if you were using purely Designer triggers from Q-Sys, you would only need one I/O Handler and one Enqueue Trigger Control.
Each component can be configured to show any of its “Pins” - points of interaction with other parts of the system. In this case, we have exposed one pin for the override control to set the colour value, and connected a Colour Picker to it.
Configuring Trigger/Scene/Timeline numbers#
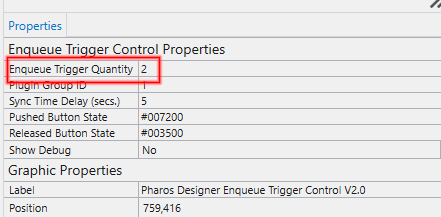
In a typical setup you probably want your Q-Sys system to control some number of scenes, timelines or triggers. This is done by editing the value for quantity shown in the properties of the component:
For example, this will give access to 2 triggers in Run mode.
Adding Controls to a UCI#
Once we have configured the required plugins and the control objects to be accessible; we can now add controls to the UCI. This is most easily done by opening the component you want controls from, copying the button you require (for example, the button to activate a timeline), and then pasting it into the UCI.
The same applies to other components - for example, to add a colour picker, open the colour picker which is connected to the Override Control, and copy the picker to paste on to the UCI design.
After you have pasted your control, you can customise the look and feel of it by altering text, colours and fonts.
Connecting to your Q-Sys System#
Once you have the basics of configuration done, connect to the Q-Sys system using File -> Save to Core and Run (F5).
This will upload to the Q-Sys controller.
Now in this connected mode, you can establish a connection to the Designer system.
Double-click the IO Handler component in the Schematic view.
You will now see this component in its live state where you can initiate a connection to the Pharos controller. Verify the IP address of your Pharos controller, the connection protocol to use (HTTP or HTTPS), and the web API port.
Once you have everything configured, click Login. You should see the HTTP status update to show a successful login.
The login credentials are stored at the Q-Sys processor, so this will happen automatically on a reboot of the Q-Sys controller.
Retrieving Information about Control objects#
To retrieve the information about control objects, go to the relevant control object view and specify the range for the objects you want to control.
For example, below is how you would specify Scenes 1-3.
Again, once you have entered this information, it is retained in the Q-Sys design.
Ready to Use#
After completing those steps the system is now ready to use.
Observe that the touchscreen will control our Pharos Designer Timelines, Scenes and Triggers, and allow you to set overrides.