Once you have created your plan and added your fixtures you need to patch them, that is to say connect them to real fixtures via the appropriate Controller (LPC 1, 2, 4 or X), interface (port), protocol and address. Patching is optional for programming and simulation but fixtures must be patched eventually for the LPCs to control them, including using Output Live in the Simulator.
NOTE: The AVC does not require patching.
Before we cover patching in detail let's look at some of the terms used:
| Term: | Description: | For more information: |
| DMX | A digital serial control protocol for entertainment lighting. Officially called DMX512-A, it was developed by the USITT and has become the standard protocol for entertainment lighting control using the RS485 physical layer. | USITT DMX512 |
| RDM | Remote Device Management, an extension of the USITT DMX512 protocol that supports bi-directional communication with dimmers & fixtures. | RDM |
| eDMX | A shorthand term for DMX-over-Ethernet protocols, see KiNet, Art-Net II, Pathport and sACN below. | |
| KiNet | A proprietary Ethernet control protocol developed by Color Kinetics (now Philips Solid State Lighting) used to control only their Ethernet PSUs. | |
| Art-Net II | A DMX-over-Ethernet protocol developed by Artistic Licence and widely used in the entertainment industry to distribute multiple universes of DMX data. | |
| Pathport | A DMX-over-Ethernet protocol developed by Pathway Communications and widely used in the entertainment industry to distribute multiple universes of DMX data. | |
| sACN | Streaming ACN (Advanced Control Network), a DMX-over-Ethernet protocol developed by ESTA to distribute multiple universes of DMX data. | ESTA |
| RIO | The Pharos Remote Input Output 80/44/08 can output up to 96 channels of DMX per unit. See here for more information on patching to a RIO. | |
| DVI | Digital Video Interface, a standard for the delivery of digital video data to computer monitors. Used by certain LED manufacturers (for example Barco and Martin Professional) to drive their LED controller products. | |
| DALI | Digital Addressable Lighting Interface, a digital serial control protocol for architectural lighting. Developed by Philips Lighting it has become a standard: IEC 60929. DALI fixtures are not patched using this window, see DALI. | DALI |
| Universe | A common term given to a single DMX data link or port. A DMX universe carries 512 channels of control data each with 8 bit resolution. A single dimmer will use one channel while more complex fixtures will use multiple channels as required. | |
| Port | The KiNet equivalent to a universe. | |
| DMX Address | The term used to determine which of the 512 control channels of a DMX universe a fixture should look at to take its own control data. This "start address" must be set on the fixture or dimmer rack itself as well as patching the control system. |
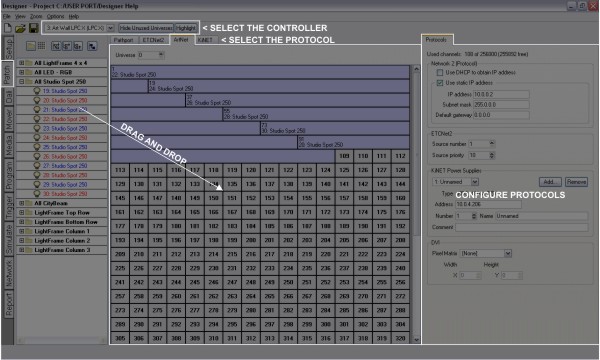
This window comprises three sections, to the left is the Browser, to the right the Protocol configuration pane, with the rest of the window being a graphical representation of a protocol's port or universe. The number of address columns displayed per row can be changed using Options > Preferences > Patch.
If you are
Use the Controller pull-down to select the Controller for patching. Use the Hide Unused Universe button to suppress unpatched universes and the Highlight button to bring the selected fixture(s) to its highlight values, typically 100% intensity in open white for easy identification.
Use the tabs across the top of the graphical area to select the required protocol and then the universe or power supply & port pull-downs to select the target for patching which will be graphically displayed.
Simply select one or more fixtures in the Browser and drag them onto the required start address of the graphical representation. Right click on a patched fixture to unpatch it or clear the entire universe/port, drag it to move it (change its address). Fixtures may be patched to multiple addresses and universes/ports. Patched fixtures are shown in blue in the Browser, unpatched black.
Fixtures may be patched to as many locations and universes as is required although typically a fixture will only be patched to one unique address. The Designer software will prompt you with a warning dialogue should you attempt to patch a fixture that is already patched, select Continue or Unpatch Existing as required. This prompt can be turned off if it proves aggravating.
However, you can not patch more than one fixture to the same address; a DMX channel can only be controlled by one parameter so fixtures can't overlap at all. If you drag one fixture onto another the incoming fixture will highlight in red to alert you that this address is already occupied. If you go ahead and drop it there anyway the software will prompt you whether to continue and unpatch the existing fixture(s) for you,select Ok to proceed or Cancel to abort. Again, this prompt can be turned off.
Some fixtures, for example the Vari*lite VL5, need to be patched twice since they have two distinct patch points, one for the intensity control (patched to the dimmer rack) and another for the fixture's automation controls.
or
NOTE: The appropriate Controller must be on the network and correctly associated to highlight fixtures. Fixtures can also be highlighted from the plan in Setup.
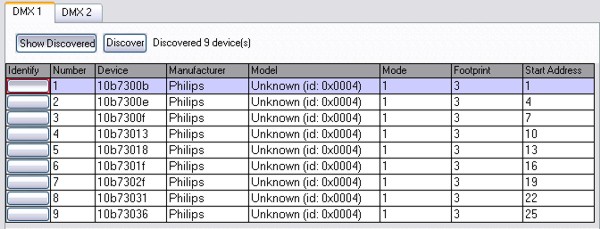
In the DMX patch tab, press 'Discover' to find RDM-capable devices attached to the current Controller. The Discover button is only enabled if the current Controller is associated with a physical Controller and that Controller has been found on the network.
Toggle 'Show Discovered' to show and hide the discovered RDM devices.
To identify a device, toggle the button in the Identify column of the table. To readdress a device, enter a new value in the Start Address column.
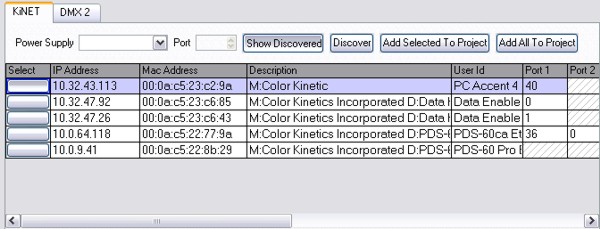
In the KiNet patch tab, press 'Discover' to find KiNet power supplies.
NOTE: KiNet discovery is performed via the network interface of the computer running Designer, not via the Controllers. If the computer has more than one network interface then you will be prompted to select which network interface to use for KiNet discovery. The network interface must have an IP address in the 10.x.x.x range for discovery to be completely successful.
Toggle 'Show Discovered' to show and hide the discovered power supplies.
Power supplies that have an IP address that is already used by the current Controller will appear in grey.
To add a power supply to the current Controller, press the button in the 'Select' column and press 'Add To Project'. A new power supply will be added to the current Controller and that power supply will be automatically selected. If Designer doesn't recognise the type of the power supply, you will be prompted to select it from a list.
To add all the discovered power supplies to the current Controller, press 'Add All To Project'.
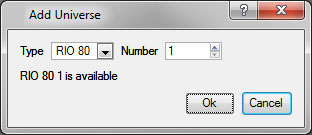
In the RIO section of the patch tab you'll need to add a universe that will joined to a RIO before you can patch fixtures. Click 'Add Universe' and choose the RIO to which you want to output that universe of DMX.
The RIO is capable of outputting 96 channels of DMX. Any channels patched to a RIO will subtract from the maximum channel output capacity of the Controller. The RIO and Controller must be on the same network.
To output data using the DVI port you must first create a pixel matrix that matches the LED controller's pixel map. Once this has been done, use the Pixel Matrix pull-down on the protocol tab to select which matrix will be output via the DVI port and select an X & Y offset as required. Any programming for the fixtures in the pixel matrix will now output on the DVI port, not just programming applied directly to the pixel matrix.
The LPC X's DVI port is set to a fixed 1024x768 @ 60Hz resolution which is compatible with most LED controllers. The LED controller (or monitor) MUST be connected when the LPC X boots or resets for the port to become active.
At the top of the Protocols pane is an indicator of the number of used and available channels for the selected Controller.
When the Controller is an LPC X, and if you have not associated the controller with a physical device, then you are allowed to patch fixtures up to the capacity you have chosen (see Controller Association).
However, when you associate an LPC X with a physical device, you will only be able to associate to devices which have a capacity equal or greater than the patched fixtures. After associating with a device, you will be unable to exceed the capacity of that device.
When using an LPC in a project it is possible to allow eDMX from another eDMX source to be passed through to the controller’s DMX ports. With an LPC selected, the bottom of the protocols pane will show the eDMX Pass-Thru settings. Select which universe the DMX port will be transmitting. Note that with an LPC 2 you'll be able to choose a different universe for each DMX port on the controller. There is also the option to auto-revert to the project’s output if eDMX isn't received for a specified amount of time.
Note that only Art-Net and sACN are currently supported for eDMX pass-thru.
By default, a controller with less than 30 universes of Art-Net patched will broadcast all data until a device requests unicast for a specific universe. Controllers with more than 30 Art-Net universes patched will only unicast data to devices requesting universe data and will not automatically broadcast.
There is the option to 'Disable Broadcast' for a controller. The controller will still unicast data to devices that request it. There is also the option to 'Always Broadcast' on a per universe basis. This will force the controller to always broadcast that universe's data. 'Always Broadcast' will override the 'Disable Broadcast' option.