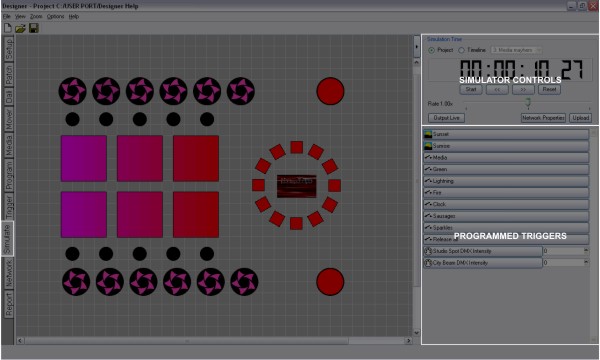
The simulator allows you to preview your programming on the plan:
The window comprises 3 sections: The main portion of the window is your plan. Top right are the simulator controls with time counter, and below them any programmed triggers. Note that the time counter shows simulated time not real time.
Use this mode to simulate a single timeline, typically the one you are editing. Select the timeline and press Start to simulate, press Reset to reset the timeline.
Use this mode to simulate the whole presentation and verify your trigger programming and timeline interaction. Any triggers created will appear on the right hand side and can be activated by clicking on them. Activating a trigger will automatically start the simulator clock, press Reset to reset all timelines and triggers.
Toggles between Start and Pause accordingly, the keyboard spacebar can also be used.
When the simulator is running or paused these buttons skip backwards or forwards in 10 second increments.
Resets the simulator, the simulated triggers (Project mode only) and releases playback so, if Output Live is enabled, the venue will go to black (fixture defaults).
Adjusts the simulator's playback speed (not the timeline's programming) from 0x (paused) > 1x (normal, default position) > 16x (fastest). Note that Reset does not reset this setting so remember to set it back to 1x (normal) when you've finished.
In the Program window, when simulating a timeline in Timeline mode, the simulator's current playback position is marked by the play head; a black vertical line and arrow on the timeline ruler:

You can grab the play head for manual positioning by clicking on and dragging the arrow along the ruler, akin to "scratching" since you are now driving the simulator by hand at whatever speed and in whatever direction you choose, very useful for examining transitions in detail for example - easiest with the simulator paused.
You can also make the simulator jump (when running or paused) by just clicking on the ruler at the required target time, very useful for getting and keeping the simulator in an area of interest, particularly with long timelines.
Any triggers which capture variables have a widget that allows values to be tested. These variables take the form of a comma-separated list and can either be numbers or text strings. Text strings should be bounded with double quotes.
For example, entering: 100, 50, "ABC", "100" would inject variable indices 1>4 with the values 100 (number), 50 (number), ABC (text) and 100 (text).
Conditions are not tested by the simulator.
By default, for any timeline that has been set to use a timecode source (see timeline properties) the simulator will emulate the timecode. If, however, a Controller is connected and receiving real timecode then the simulator can instead be made to track this real timecode by selecting Time Source from the Timecode drop-down menu.
If you need to simulate a timeline that will play in sync with an audio track in your final presentation then you can use Winamp to play the audio file and control the playback using Designer. To use this feature, you must first enable it in Preferences.
Start Winamp and cue up your audio track. In Designer's Simulator, select Winamp from the Timecode drop-down menu and start your timeline. Designer will start Winamp at the same time. Adjusting the play head in Designer will adjust the play head in Winamp automatically.
This feature is only available on Windows.
Simulation for an AVC is shown as a thumbnail image of the main AVC playback. It will not currently show text, and all transitions are displayed as a dissolve.
Output Live is not possible without associated and patched Controllers but this allows you to view the programming on the installation itself without having to upload repeatedly after every iteration. The Output Live button can also be found on the Mover window to facilitate the programming of the Mover Presets, particularly setting the position parameters.
IMPORTANT: Output Live is not possible for the AVC, the project must be uploaded.
Output Live completely overrides the LPC's playback engine with all calculations instead being performed within Designer. On large installations with multiple LPCs it may not be desirable to override all of them so it is possible to exclude LPCs from participating in Output Live, see Disabling Output Live.
If you are using the tear-off simulator (see below) then Output Live will let you maintain control of the installation throughout your programming session.
The simulator can be permanently opened for display, ideally on a second monitor:
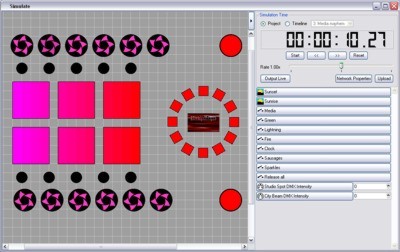
Press Ctrl (Apple) + F8 or tear off the Simulate mode tab to open this window. Incredibly helpful in speeding up your productivity.