Files#
Available onDesigner LPC FamilyDesigner VLC FamilyExpress
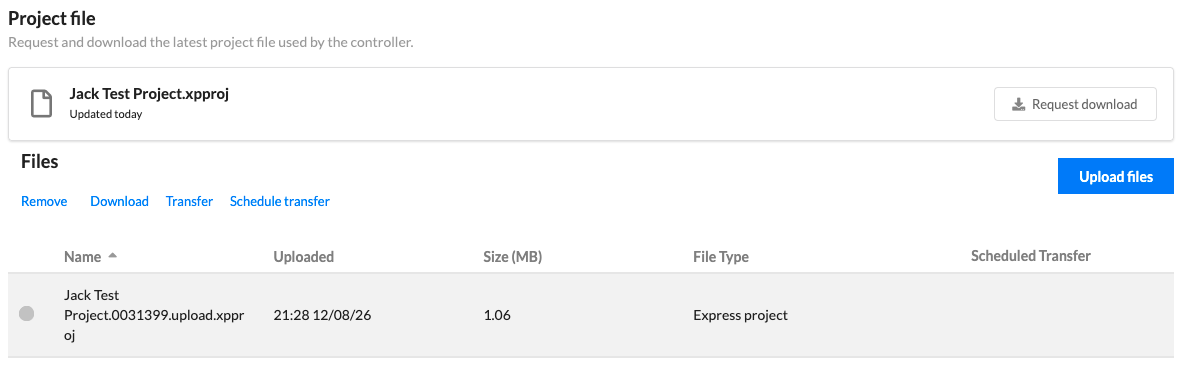
Files holds project and firmware files in Cloud, so what a device is running can be changed without a site visit. Transfers from Cloud to a device can be made at any time.
All steps below assume the relevant file permissions - see User permissions.
Uploading a project file#
A project file can be uploaded in Cloud itself, or sent to Cloud from Designer or Express.
- In Designer or Express, use the relevant Export Project to produce a
[filename].uploadfile. - In Cloud, on the Files tab, select Upload Files.
- Drag the file into the dialog and select Submit.
- Once uploaded, select it using the control to its left and select Transfer from the toolbar.
- After a short wait, check the device - the new project should be running.
Assumes you are signed in to Cloud in Designer and have selected a site.
- On the Network tab, open the Upload dialog.
- Select the devices to upload to on the devices tab.
- Tick Transfer to devices after Upload to Cloud if the file should go straight to the device. If left unticked, the file is only added to the device's file list.
- Select Upload to Cloud.
The dialog reports one of six states:
| Status | Meaning |
|---|---|
| Not Logged In | Close the dialog and sign in using the Cloud icon at the top right of Designer |
| Uploading to offline devices | Allowed, but the project only reaches Cloud - it is not pushed to the device |
| Ready for Upload | Upload to Cloud is enabled and every device shows a solid blue cloud icon |
| Uploading | Uploads are queued; the dialog shows progress |
| Upload failed | Check your internet connection first, then check you hold upload and transfer permissions on that device |
| Upload complete | Verify in Cloud |
Progress is reported per device, and the uploaded file appears on the device's Files tab in Cloud whether or not it was transferred.
Important
Express always prioritises a local connection over Cloud. If the device is reachable locally, that is the route Express will use - so to upload over Cloud you have to remove the device from its local connection first.
- Ensure you are logged in and connected to the correct site.
- Open the Upload dialog.
- Note that the site's name is listed in the upload dialog to confirm the upload will progress via Cloud.
- Set whether the file should transfer to the device as soon as it reaches Cloud. Left off, it is only added to the device's file list.
- Start the upload.
Progress is reported on the device, and the uploaded file appears on the device's Files tab in Cloud whether or not it was transferred.
Uploading firmware#
While firmware can be uploaded in the Files tab, we strongly recommend using the Firmware tab to avoid needing to upload firmware manually.
-
Find the firmware files on your computer:
-
Designer
- Windows -
C:\Program Files\Pharos Controls\Designer 2\firmware, or your install directory. - macOS - find the Pharos Designer app, right-click, Show Package Contents,
then
Contents/MacOS/firmware.
- Windows -
-
Express
- Windows -
C:\Program Files\Pharos Controls\Express\firmware, or your install directory. - macOS - find the Pharos Express app, right-click, Show Package Contents,
then
Contents/MacOS/firmware.
- Windows -
-
-
On the Files tab, select Upload Files.
- Drag the file in and select Submit.
- Select it and choose Transfer.
- The device restarts and applies the firmware.
Managing files#
Remove#
To delete a file from the Files tab:
- Select the file using the button on the left of the file entry in the table
- Select Remove in the toolbar
- Confirm deletion by typing the project file name in the validation box
Please note that deleted files cannot be recovered.
Download#
To download a file to your computer:
- Select the file using the button on the left of the file entry in the table
- Select Download in the toolbar
- The file will be downloaded
The downloaded file is the same as the one uploaded, and might not represent the file currently running on a device. To get that, see Request file.
Transfer#
To transfer a file to the device:
- Select the file using the button on the left of the file entry in the table
- Select Transfer in the toolbar
- Confirm the transfer
The file will now be transferred to the device. File transfers are flexible and respond to poor internet connections by transferring files in small sections. Check the device's log for more information about the transfer.
If you need to transfer a file to multiple devices across a whole portal, see My Files
Schedule Transfer#
To schedule a file transfer to the device:
- Select the file using the button on the left of the file entry in the table
- Select Schedule Transfer in the toolbar
- Select a date and time for the transfer to take place using the site's local time
- Save Changes
- The file will then display when the transfer is scheduled
To edit or delete a scheduled transfer, select it again and choose Schedule Transfer in the toolbar.
Request file#
A project file can be requested from the device to ensure the latest version can be worked on.

- In the Project file section choose to Request Download
- The device will then process the request and upload the file to Cloud
- The transfer may take some time
- Once complete, choose to download or delete the file
- The file will be cleared after 24 hours
Once changes have been made to the file, upload it back to the device in the same way as outlined above.